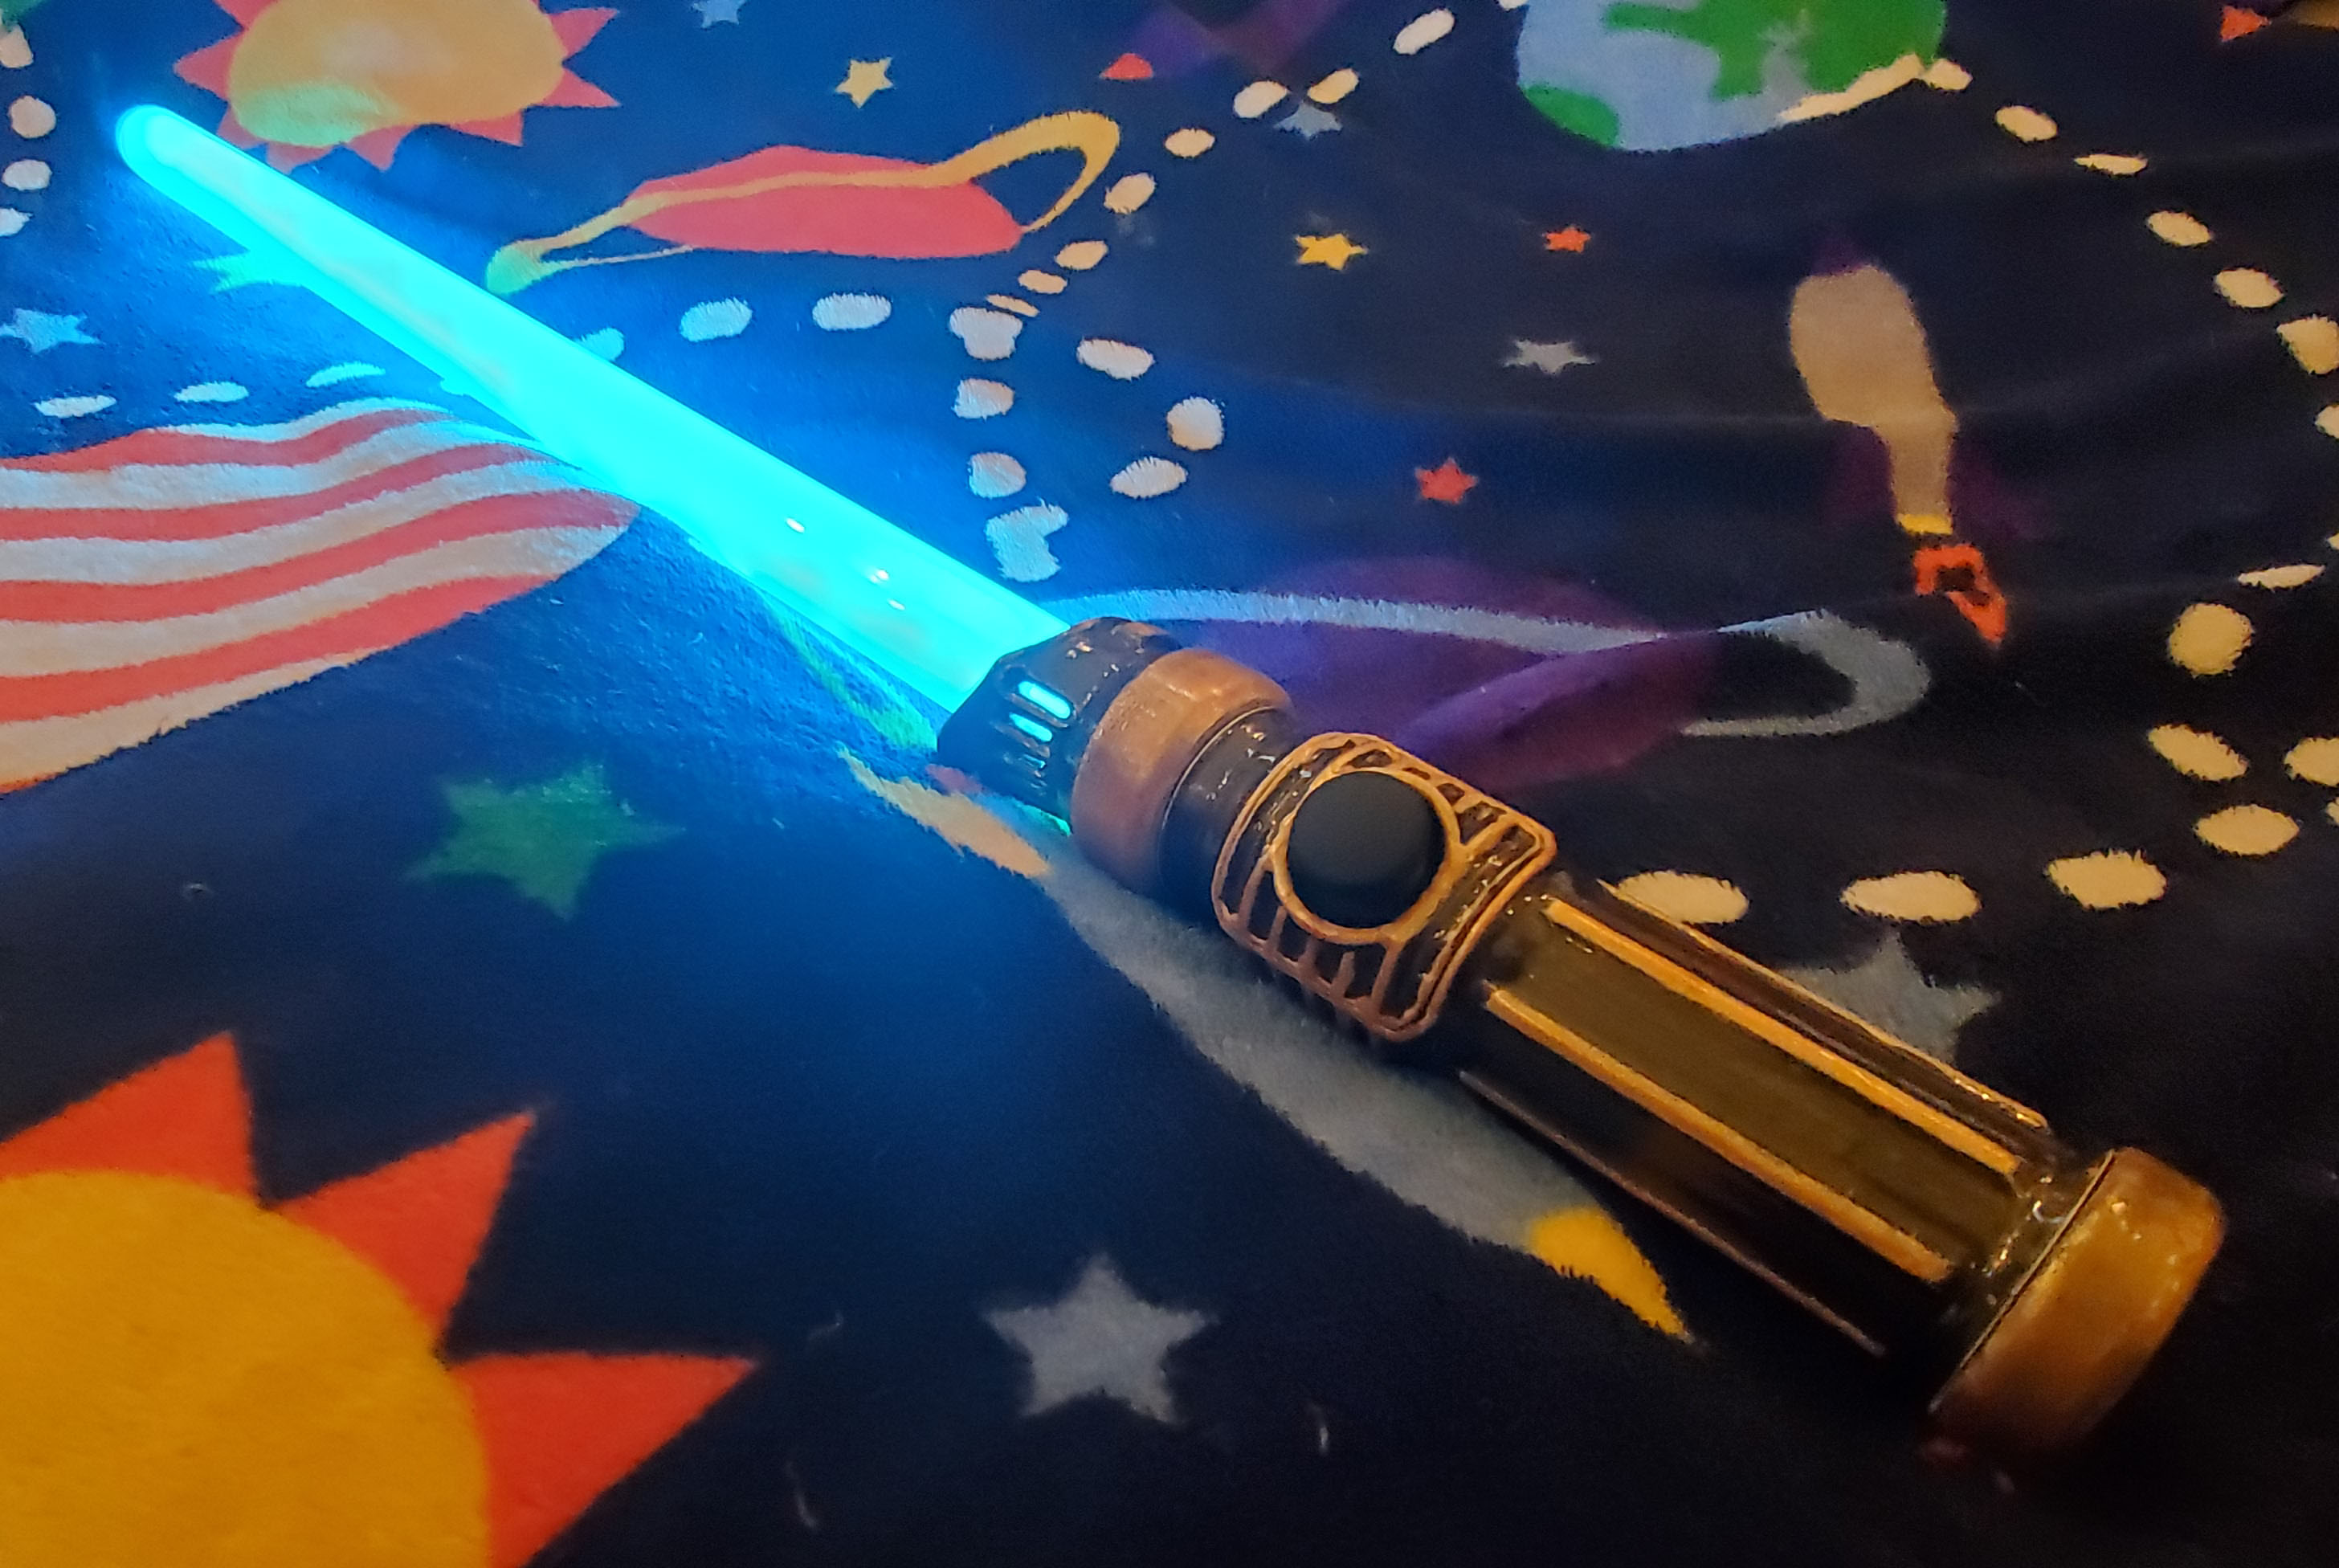
A bright saber toy for light play.
Deets
- Even LED brightness throughout blade
- Brightness, hue, pattern controlled via joystick
- Moderately robust (not meant for real faux combat
 )
) - 6+ hrs battery life
- USB rechargeable
Materials
- 3000mAh 18650 battery
- 18650 holder
- USB socket (circuit board mounted)
- 3-5v boost converter rated to 2A
- Arduino Pro Micro
- SPST toggle switch
- Playstation-style joystick on PCB
- 22ga wire, misc. connectors
- Frosted acrylic tube
- Foam tube
- Acrylic endcap
- 72x WS2812b LEDs @ 144/m
- 3D printed parts
- various bits of wire
Initial Prototype Problems
I made the proto out of nylon. It was very tough, but dis-satisfyingly fleixble and almost gummy to the point that it was quite difficult to sand. It took the metallic silver paint well, but despite moderate effort in post-processing, the stringyness and imperfections were obvious.
 |
|
|---|---|
| Initial proto design |
The shiny silver finish had become matte by the time I was done masking and painting the rest of it.
 |
|
|---|---|
| Initial proto design |
I made the handle in two pieces that threaded together. This proved troublesome since the threads decreased the useable inside diameter of the body, added a weak point if there wasn’t enough engagement, and reduced space and twisted my wires if there was plenty of engagement.
Here’s a picture of the initial design with threaded connection (waaay too many thread rotations):
 |
|---|
| Initial proto design |
And of the wires after threading on and off a few times ![]()
 |
|---|
| Initial proto design |
Once I got it all wired up, I realized my diffusion wasn’t nearly good enough. Here’s a view of the first time I turned it on - notice all the discrete LEDs showing through, nooooo!
 |
|---|
| Exploded view of basic design |
Improved Design
Desired improvements
- move away from nylon due to difficulty 3D-printing and flexibility issues
- add multi-function joystick instead of single push-button
- increase diffusion in blade to avoid seeing individual LEDs
- remove hole for charging port; add bottom cap, remove cap to charge
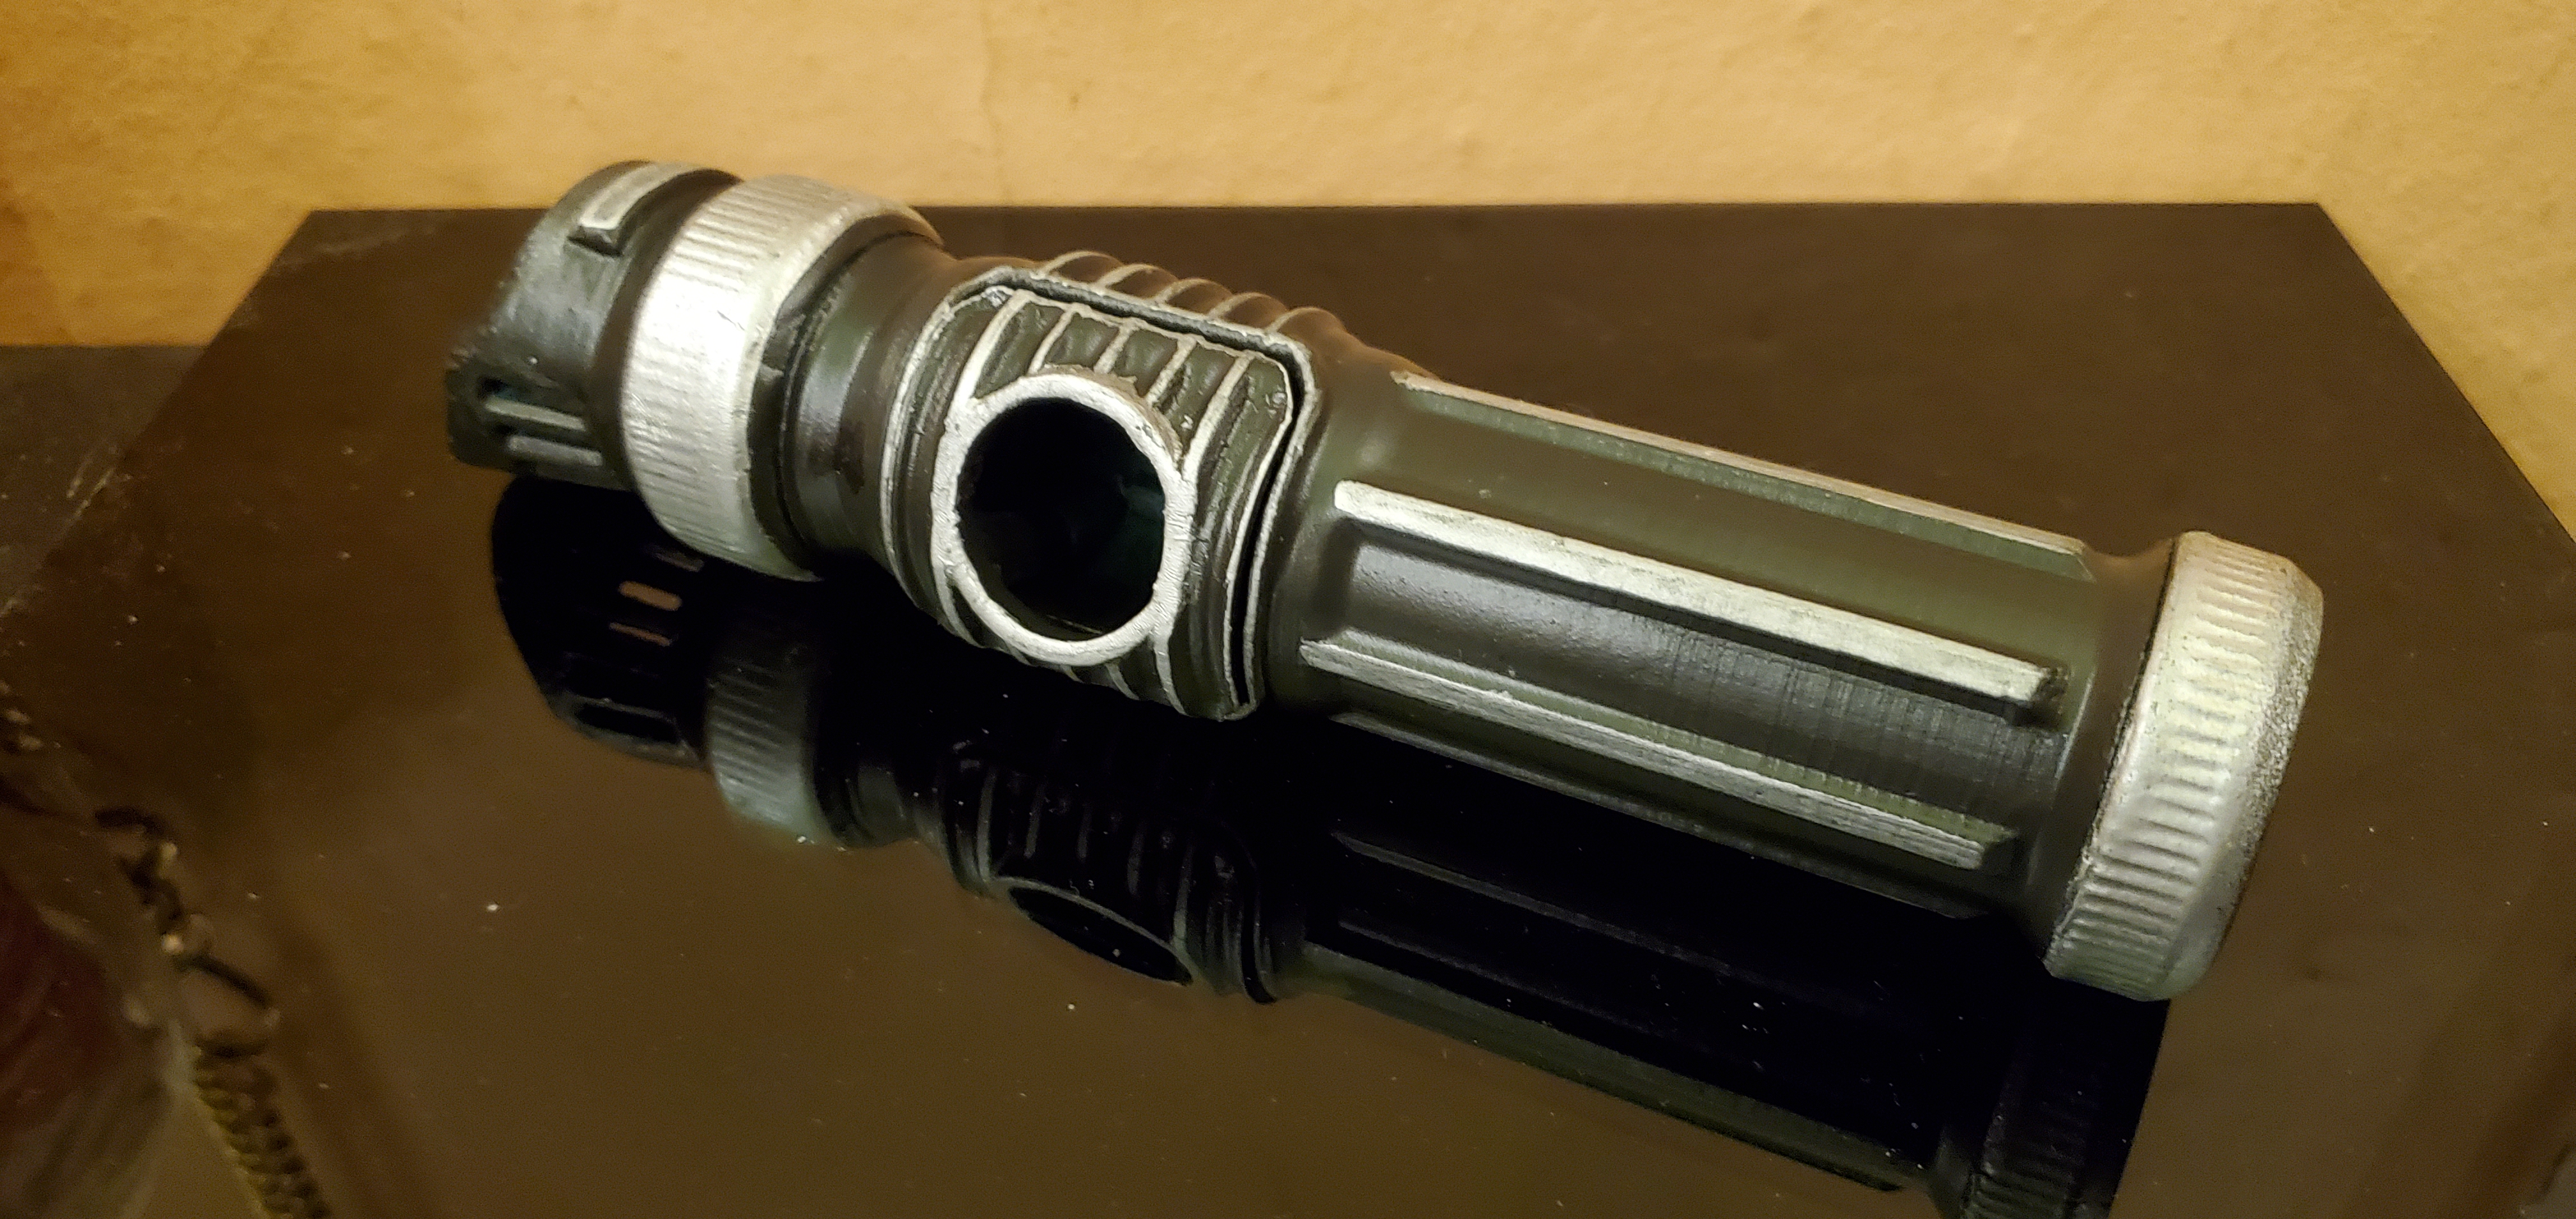
Structure
Figuring out a robust attachment method proved difficult. I knew I wanted to use ABS material and that I had to be careful of fracturing. With the addition of the joystick, space was extremely limited and there wasn’t much room for increasing the structure. I eventually landed on a 4-piece handle deisgn that includes a removeable panel for the joystick.
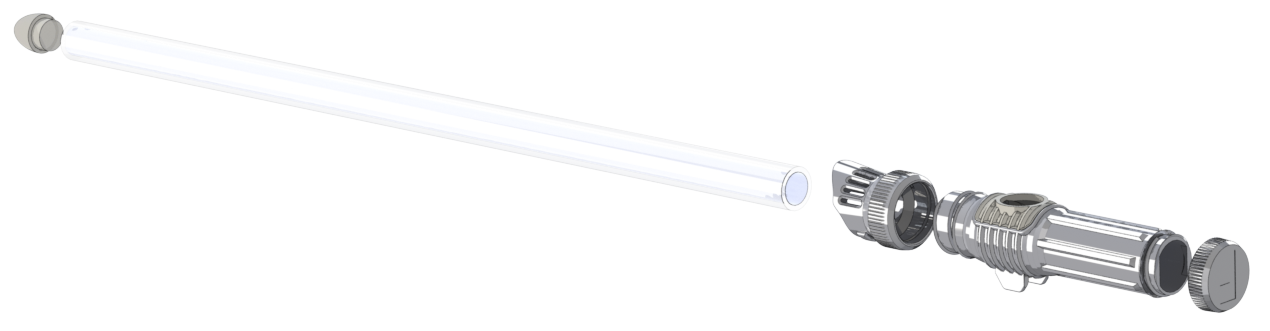 |
|---|
| Exploded view of basic design |
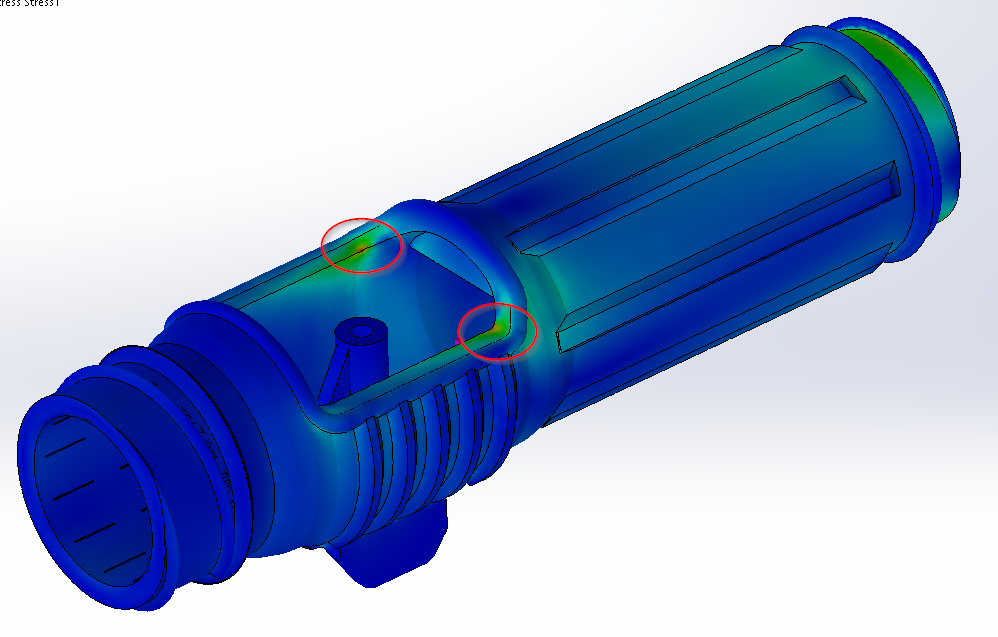
This design reduced the strength of the whole assembly by compromising the tube’s integrity and column strength. It also added some stress concentrations near the removable joystick panel. I tried to minimize stress concentrations in the design using both FEA and physical prototypes, but still ended up with some nasty areas on the top and bottom of the removable joystick cover. Several prototypes were broken during ‘product testing’ (swinging wildly and occasionally hitting things). Here’s a basic FEA image showing my demon. I’m sure my old statics professor would have something to say about this.
 |
|---|
| Stress concentrations in FEA |
 |
|---|
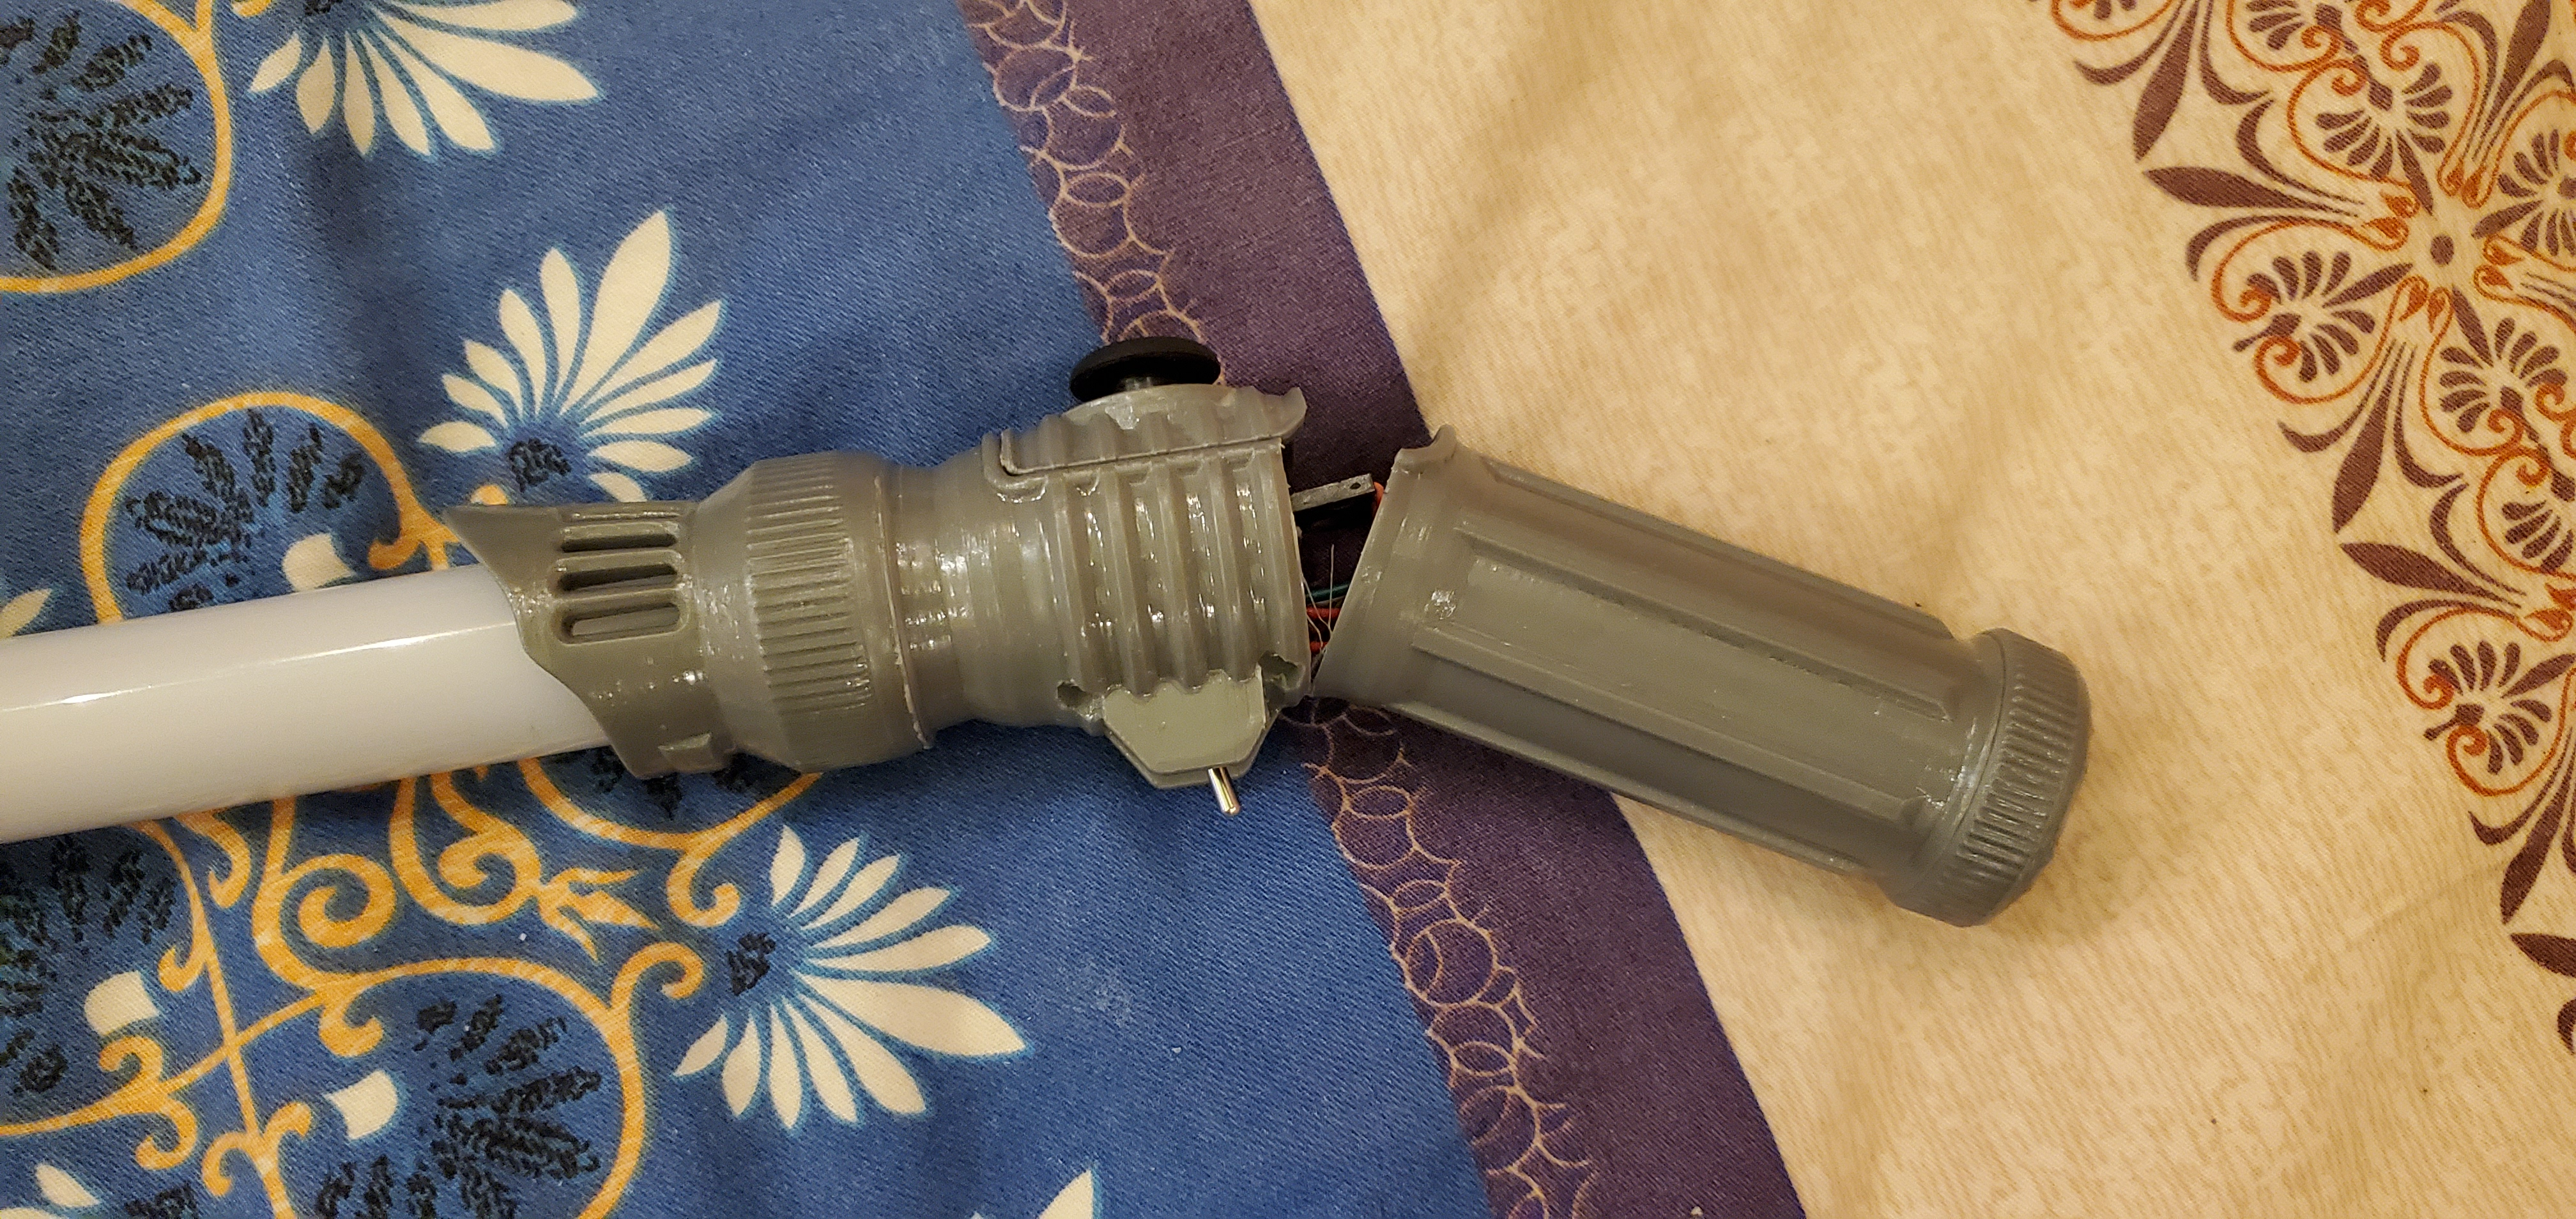
| Hey, whaddya know - that’s exactly where my prototype broke! |
Unfortunately these concentrations want to split the part right along the layer lines of the 3D print. I tried altering the orientation of the print to add strength, but my printer wasn’t quite up for the challenge. After adding material where I could, I considered this acceptable and moved on. The saber can’t be used for real fake combat, but wild swinging and gentle taps/hits are fine.
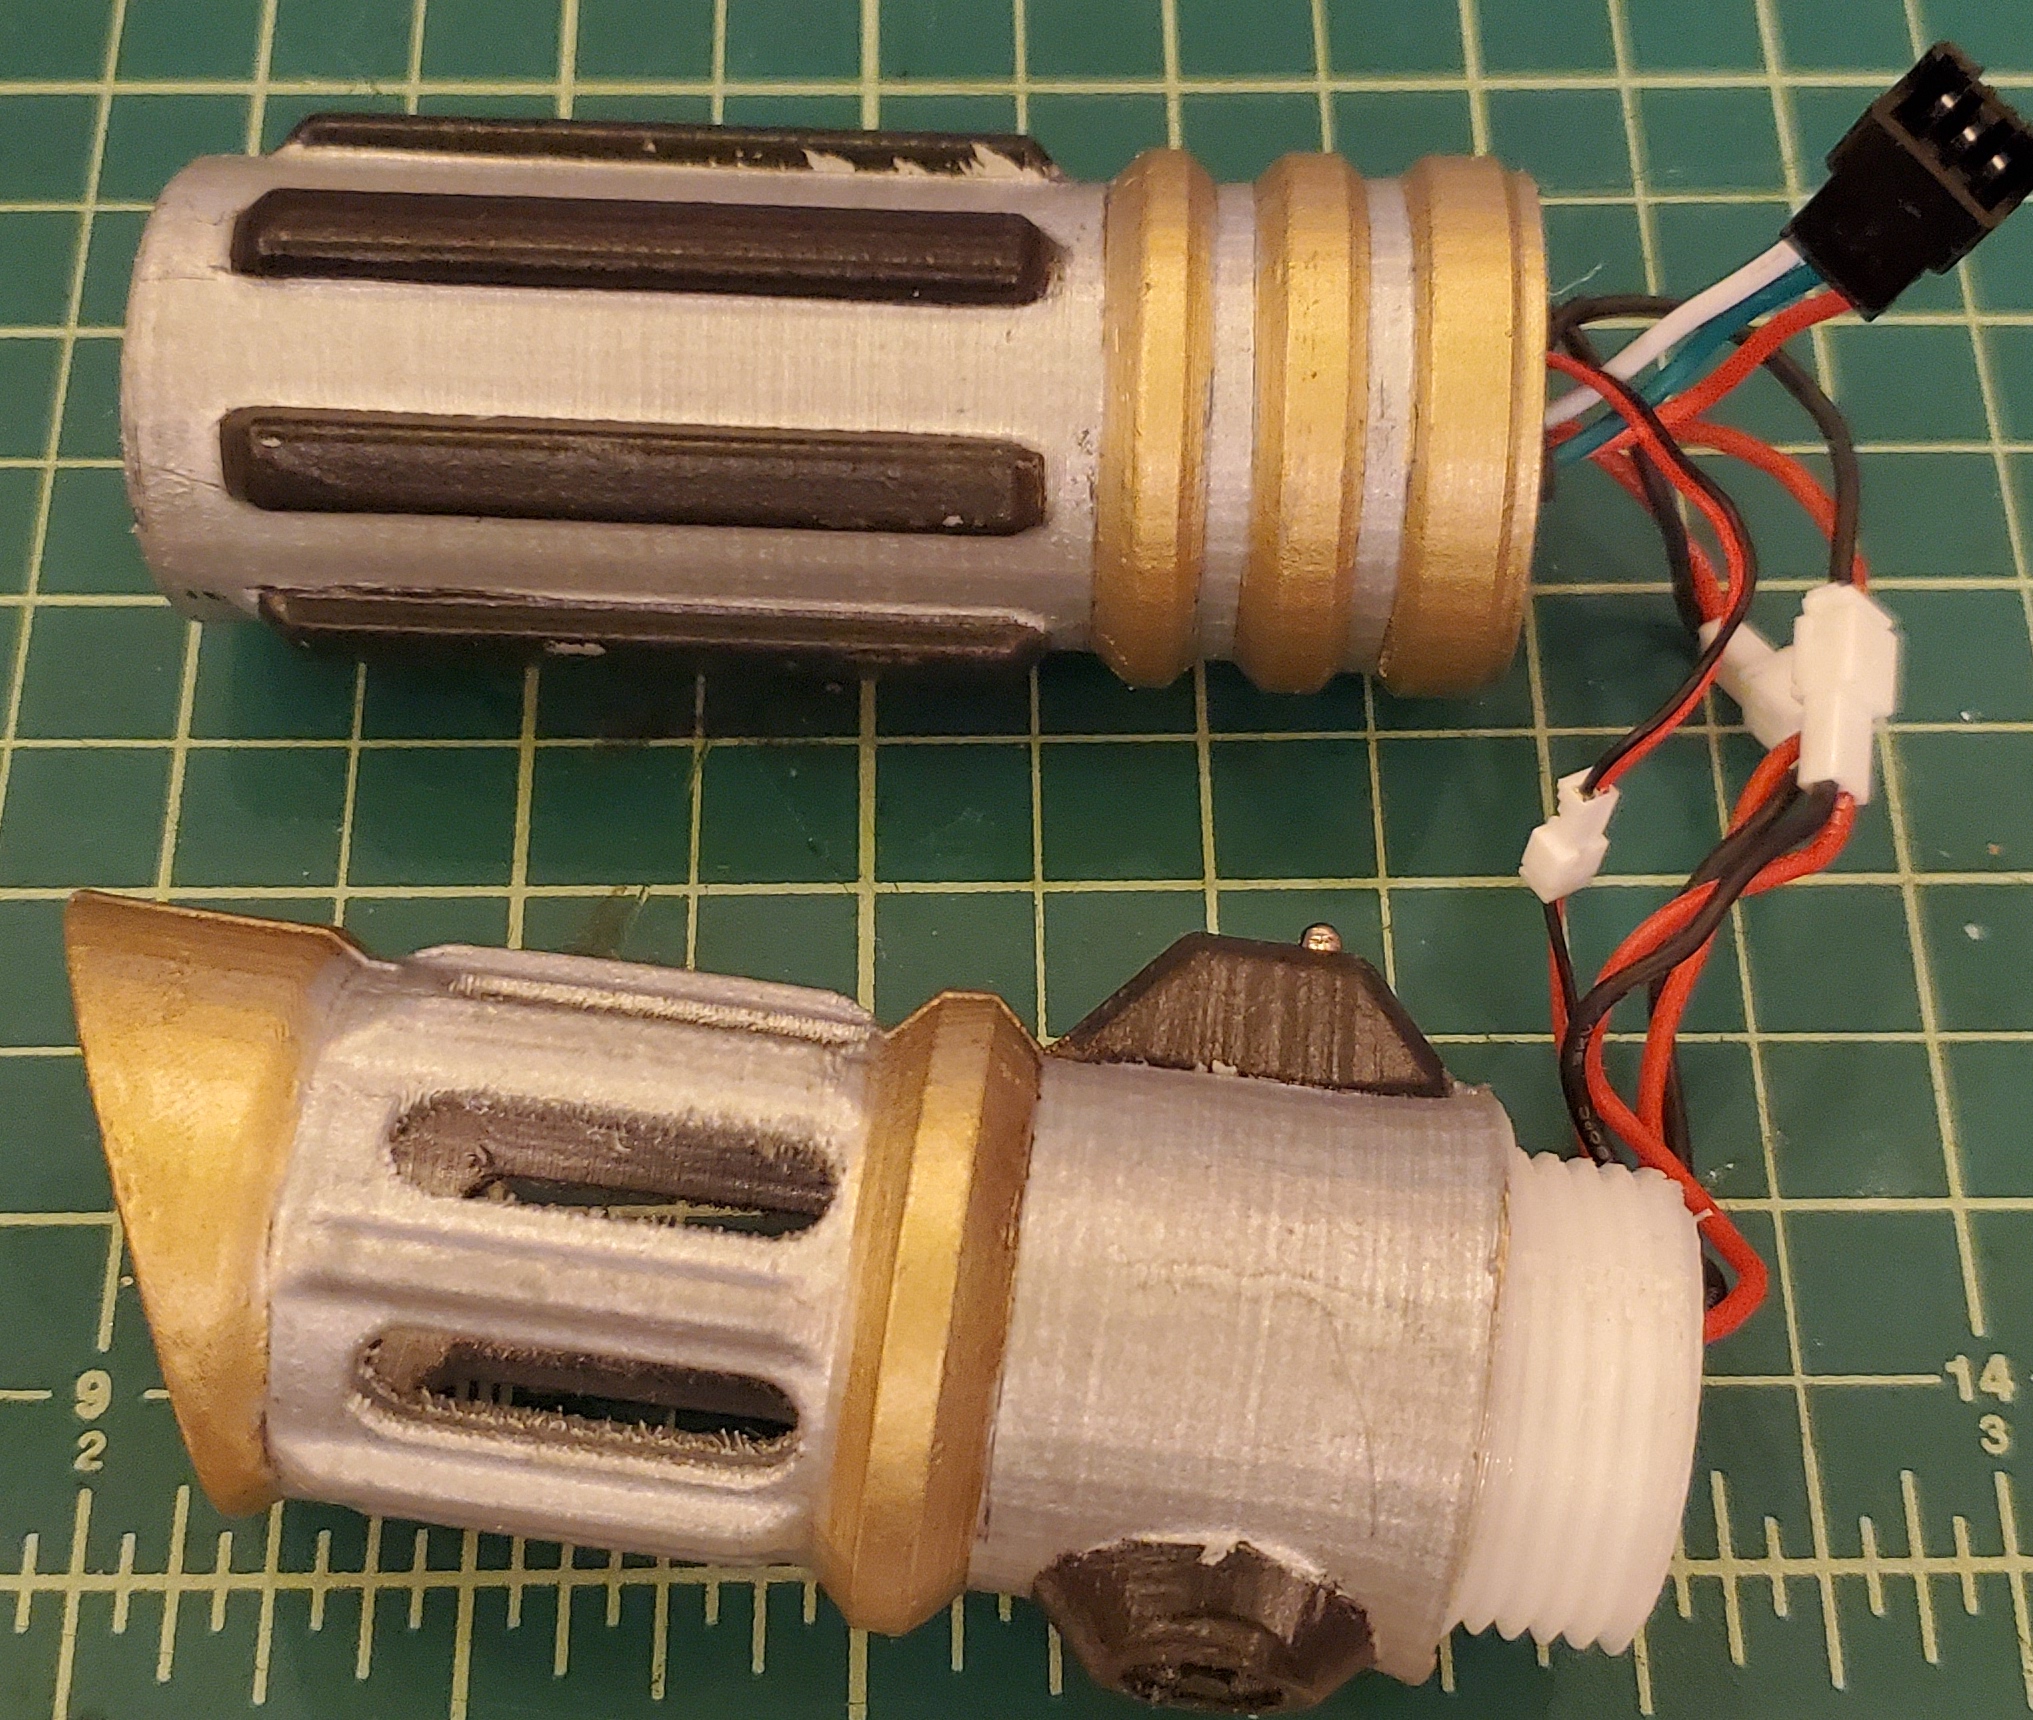
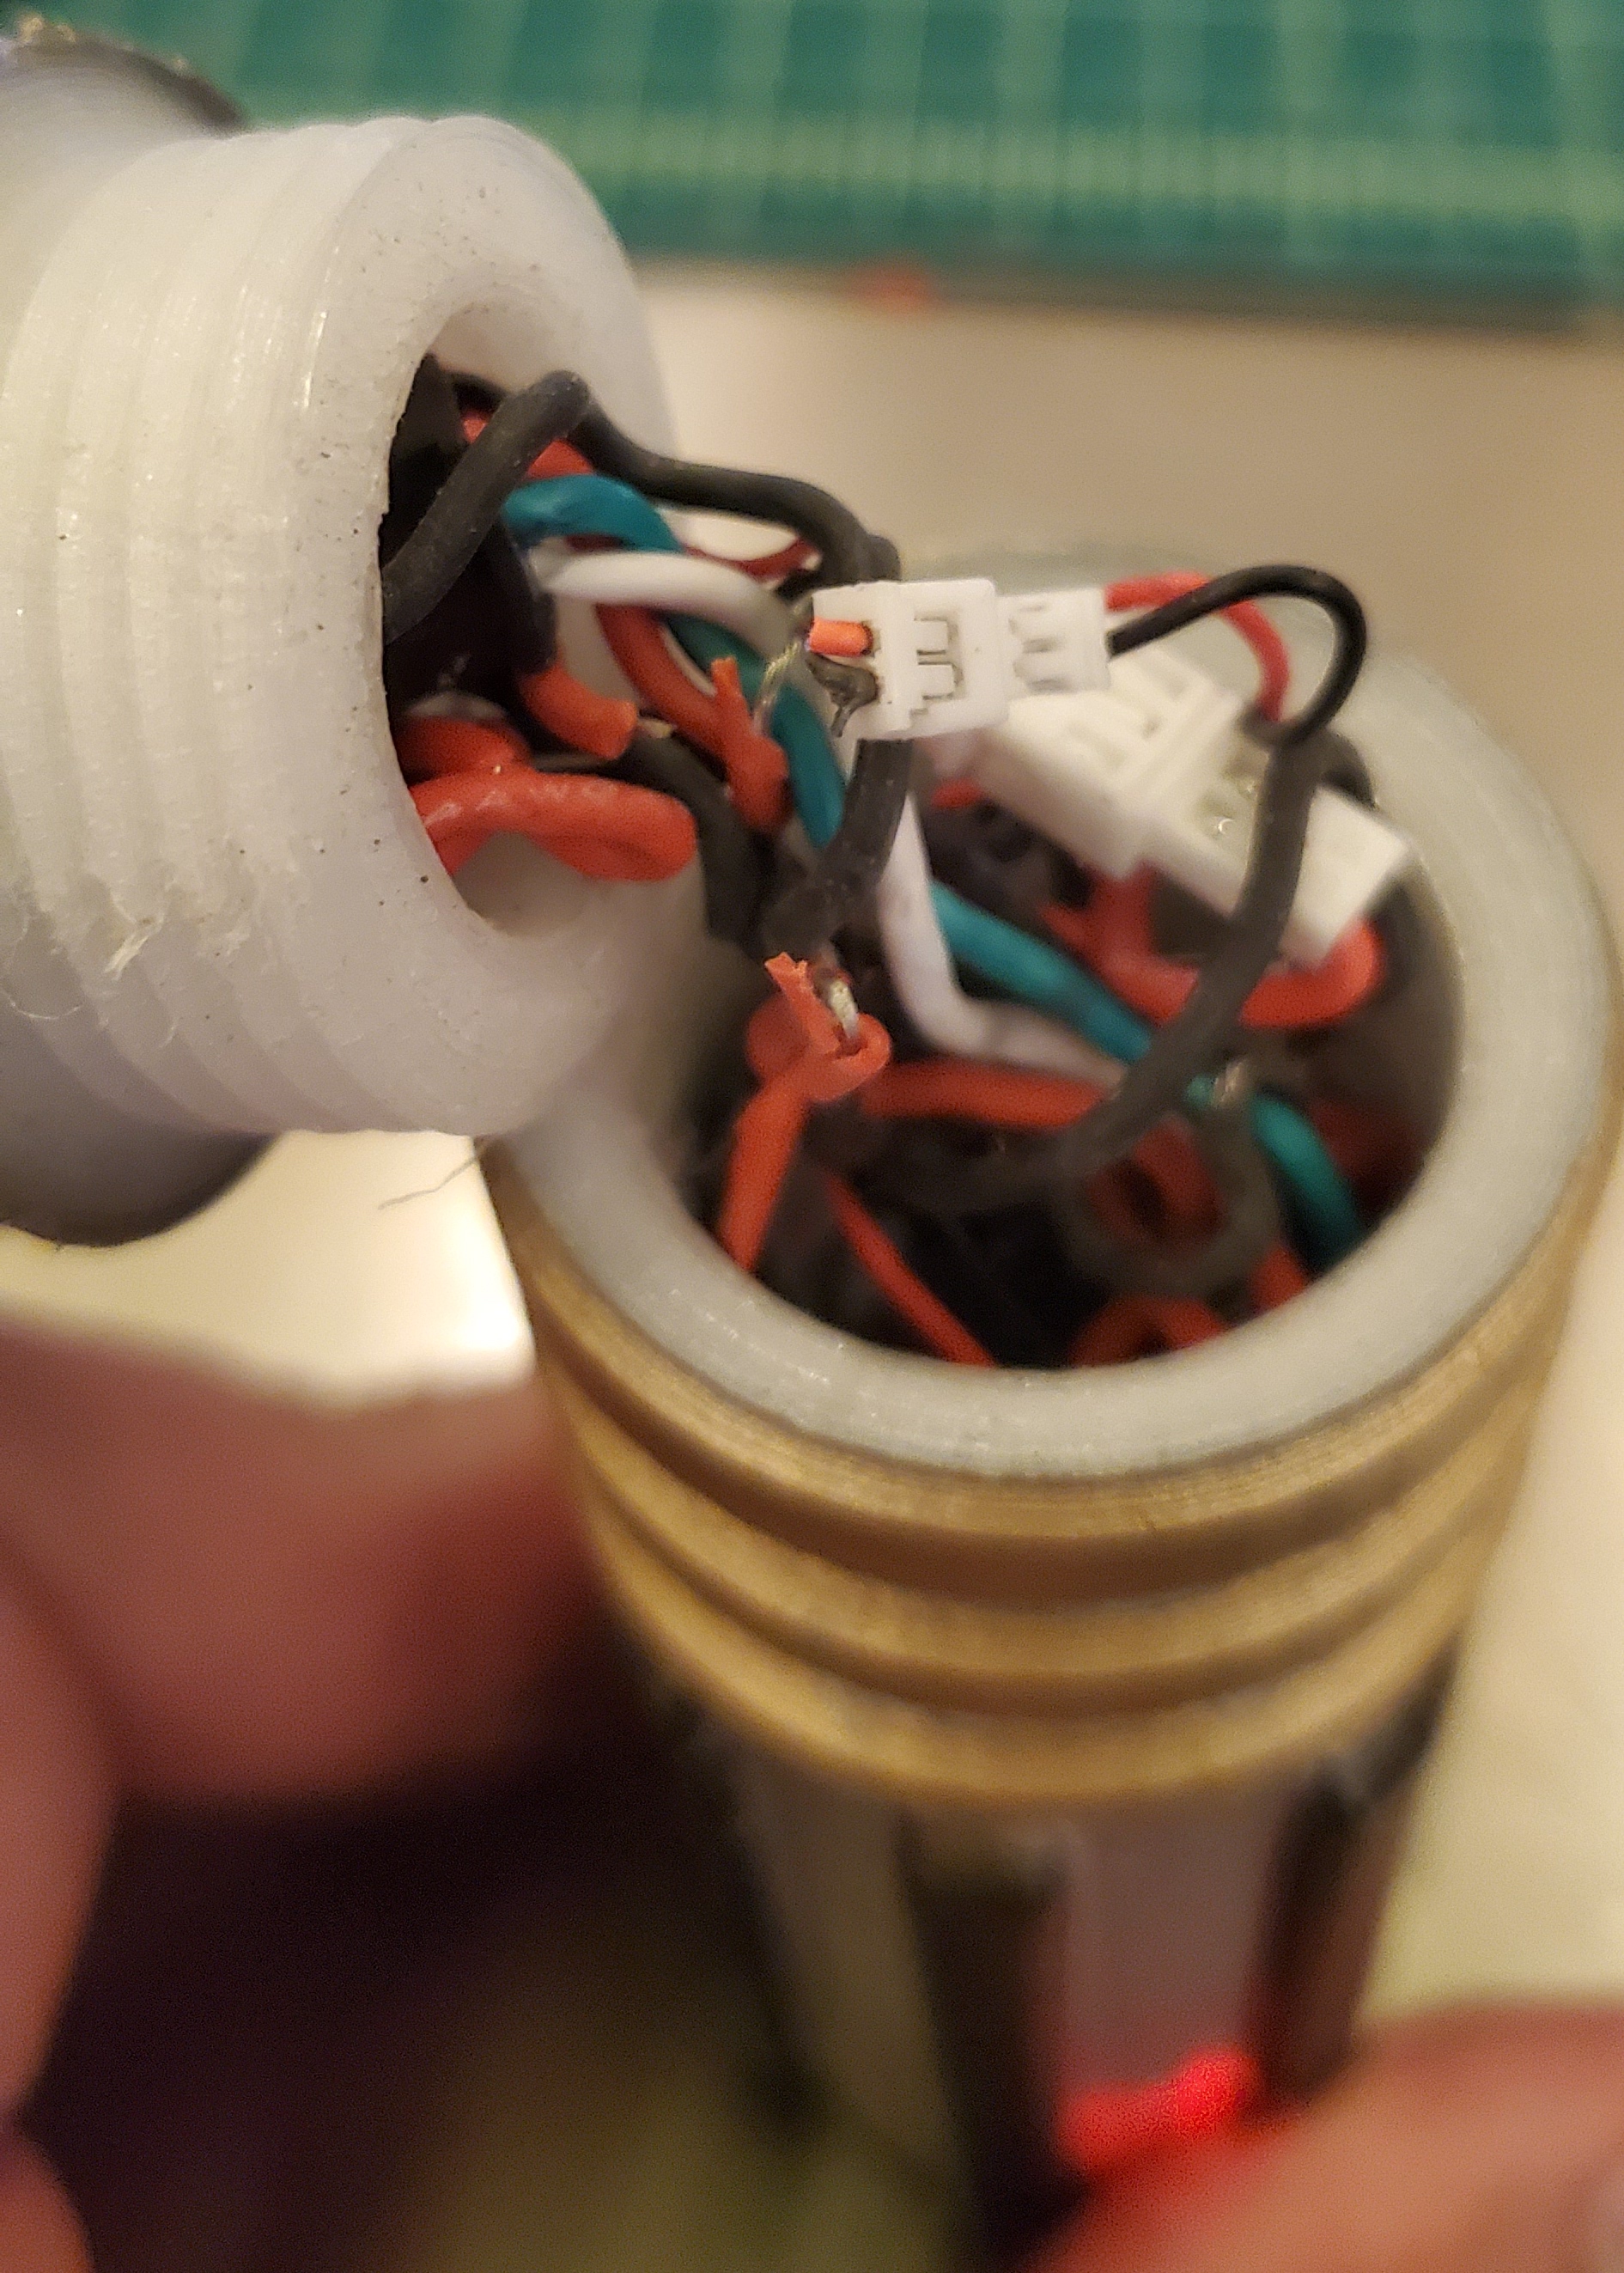
Wiring
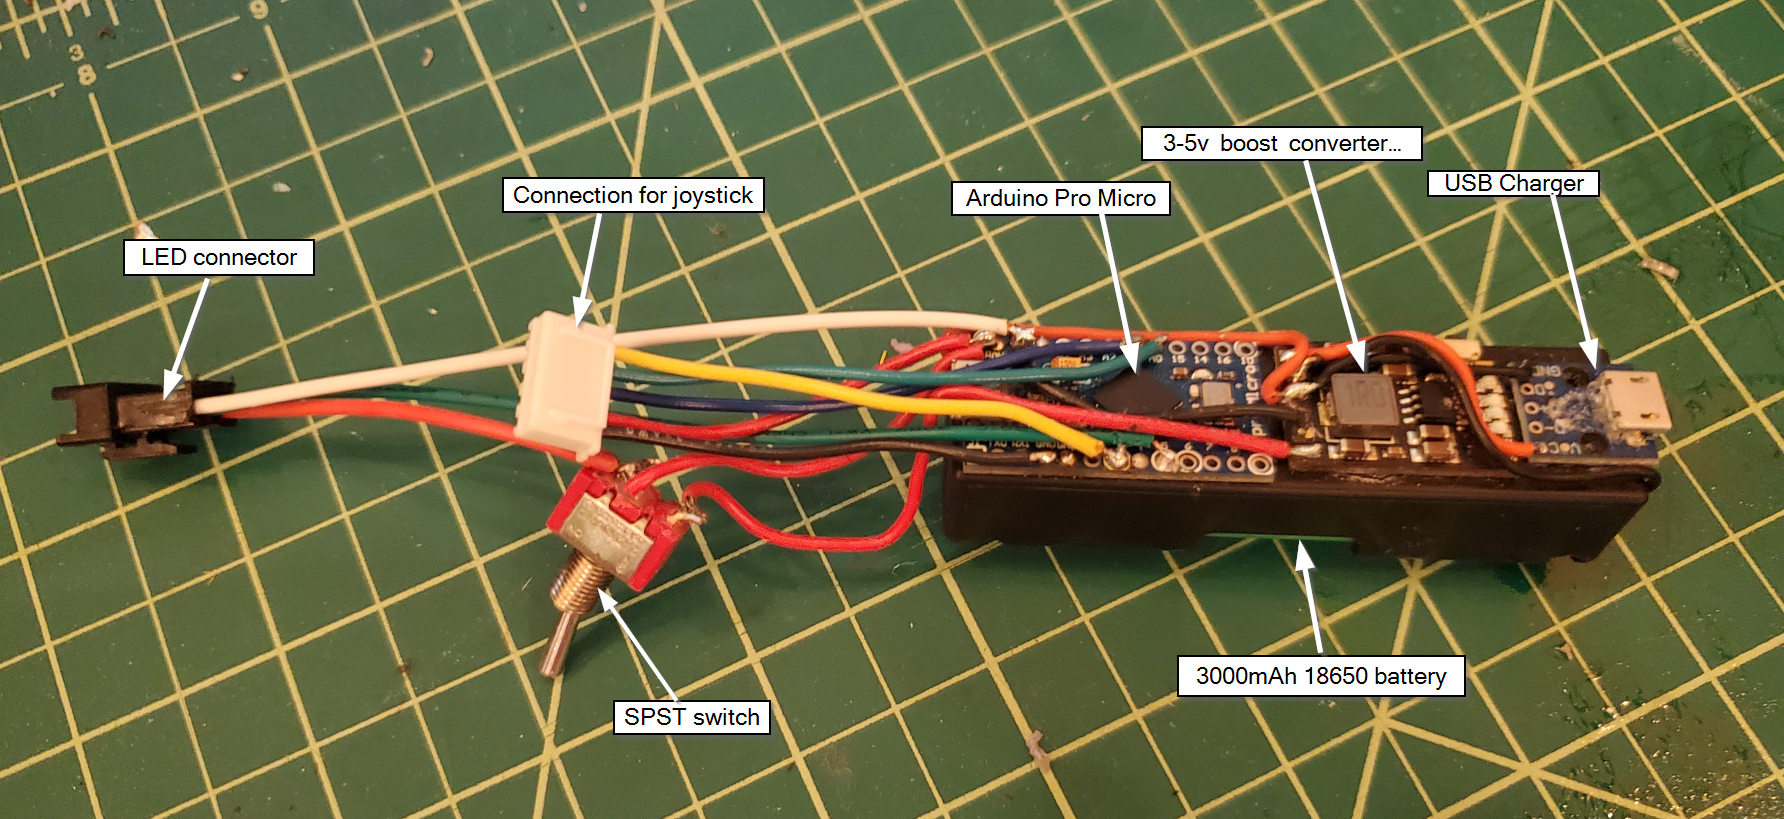
Making sound electrical connections in these tight quarters was a challenge for me. Learning from the proto, I put all the electronics in the main body to solve the ‘threading’ issue. My only connections were for the joystick and the LEDs. I did my best to make these robust connections, but it is pretty tight in that handle - not a lot of room for these massive connectors! On the plus side everything is very tightly packaged and that keeps things feeling quite solid :smiling:.
 |
|---|
| Electronics package |
 |
|---|
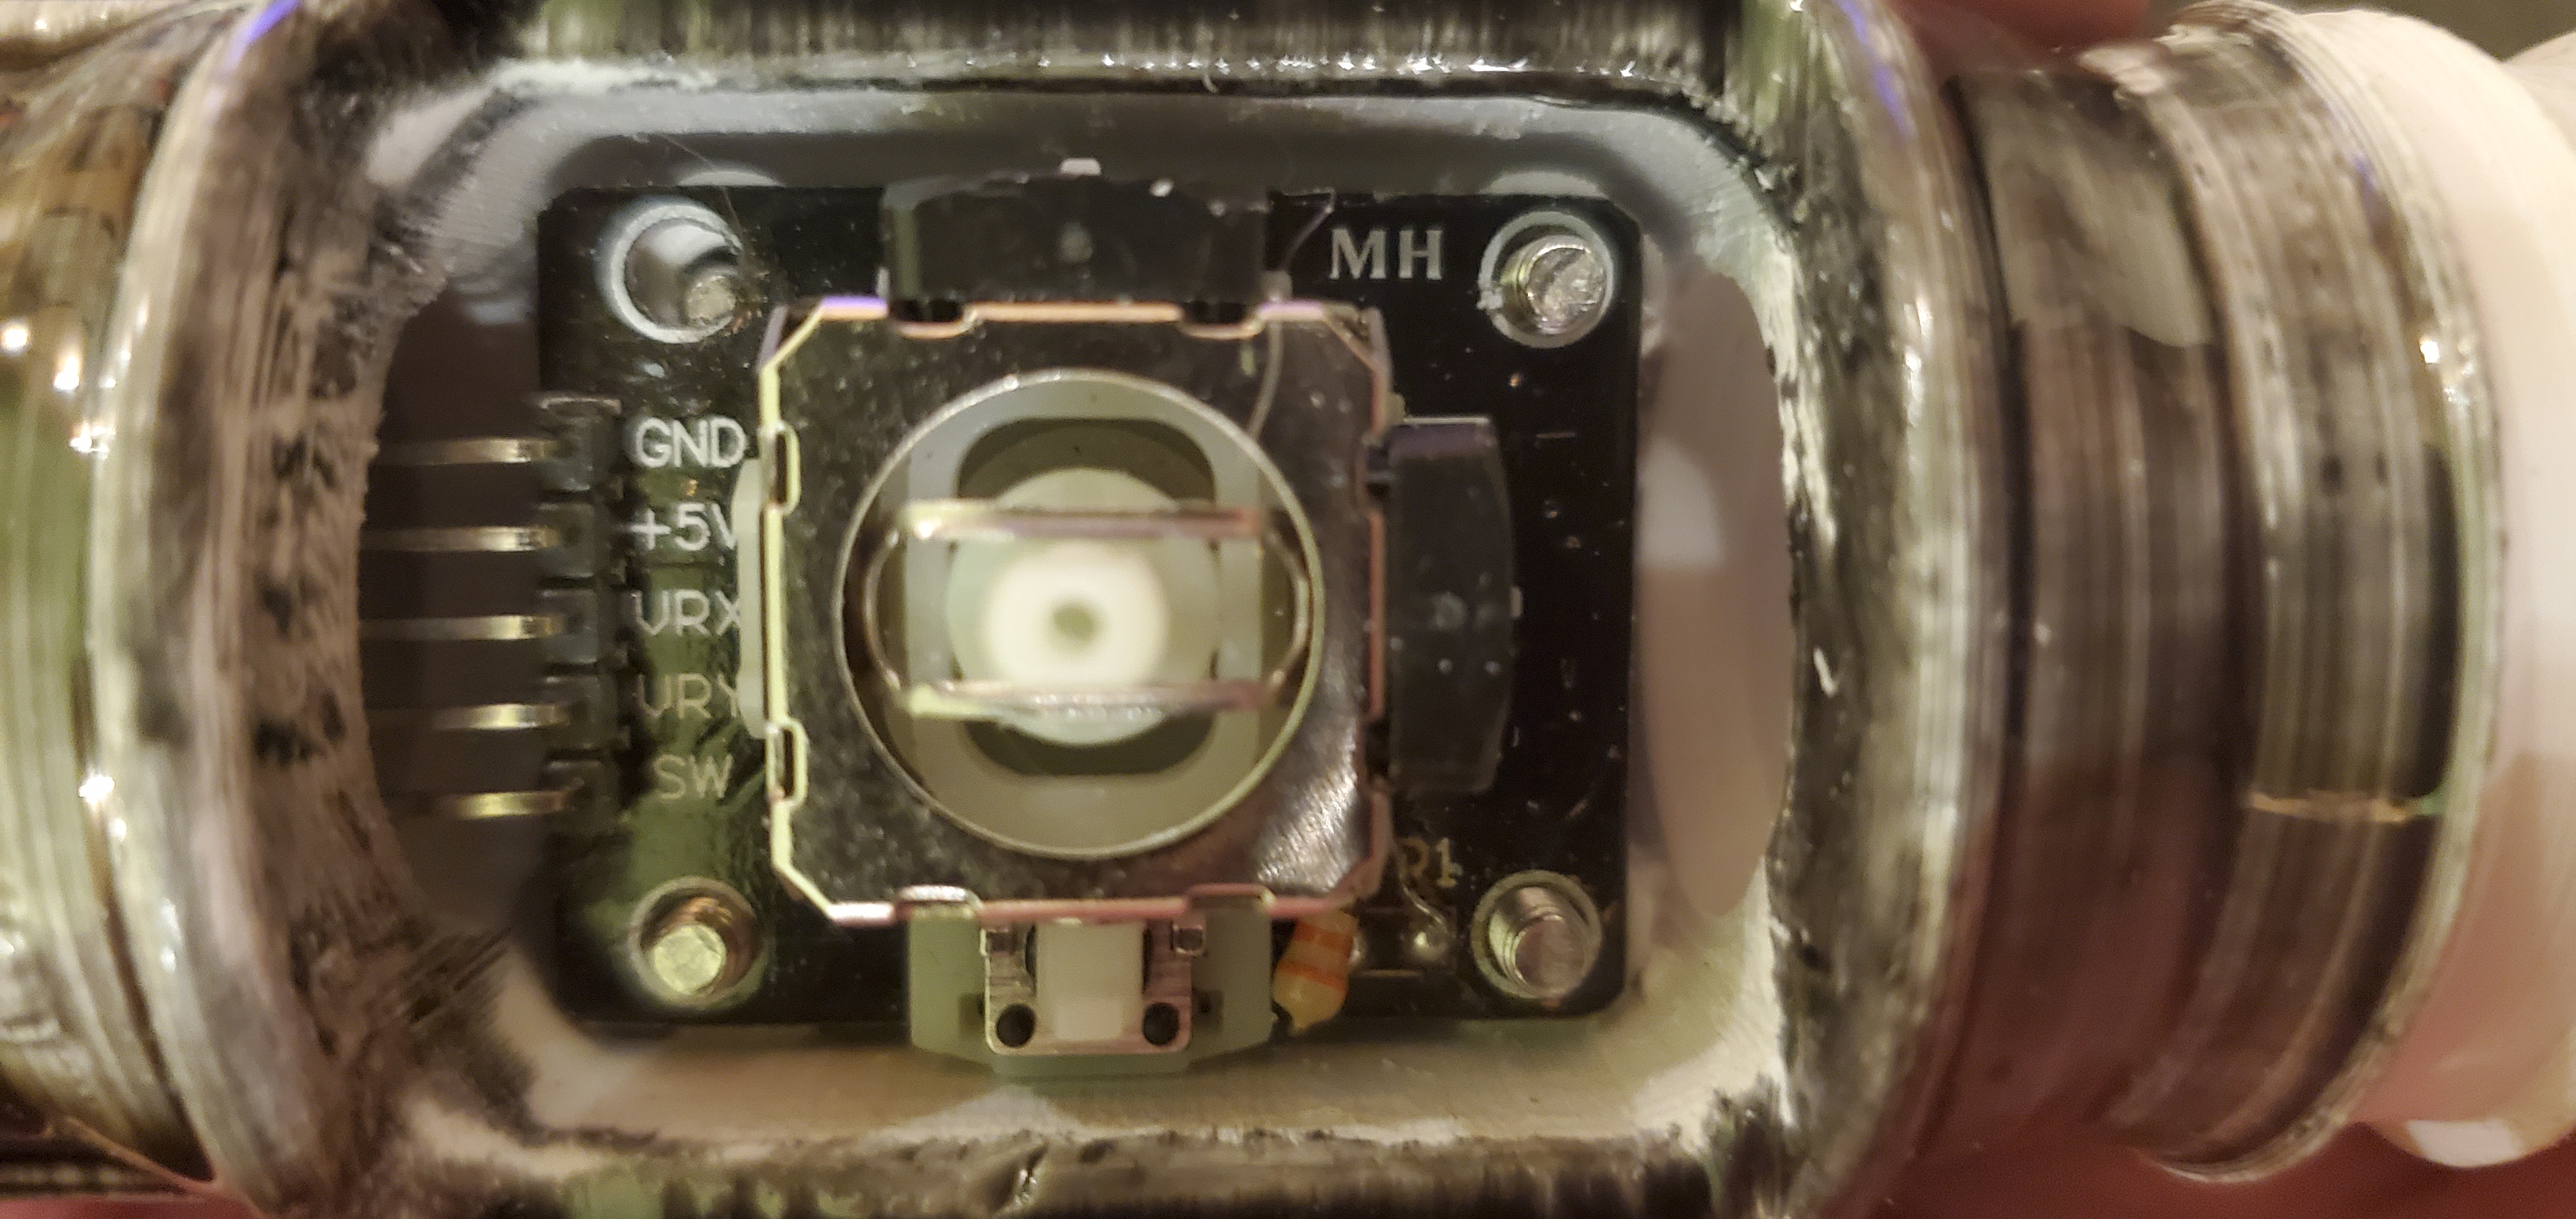
| Joystick with cover removed |
The thread-on cap made for a more finished look. It can be removed to charge via a USB Micro cable.
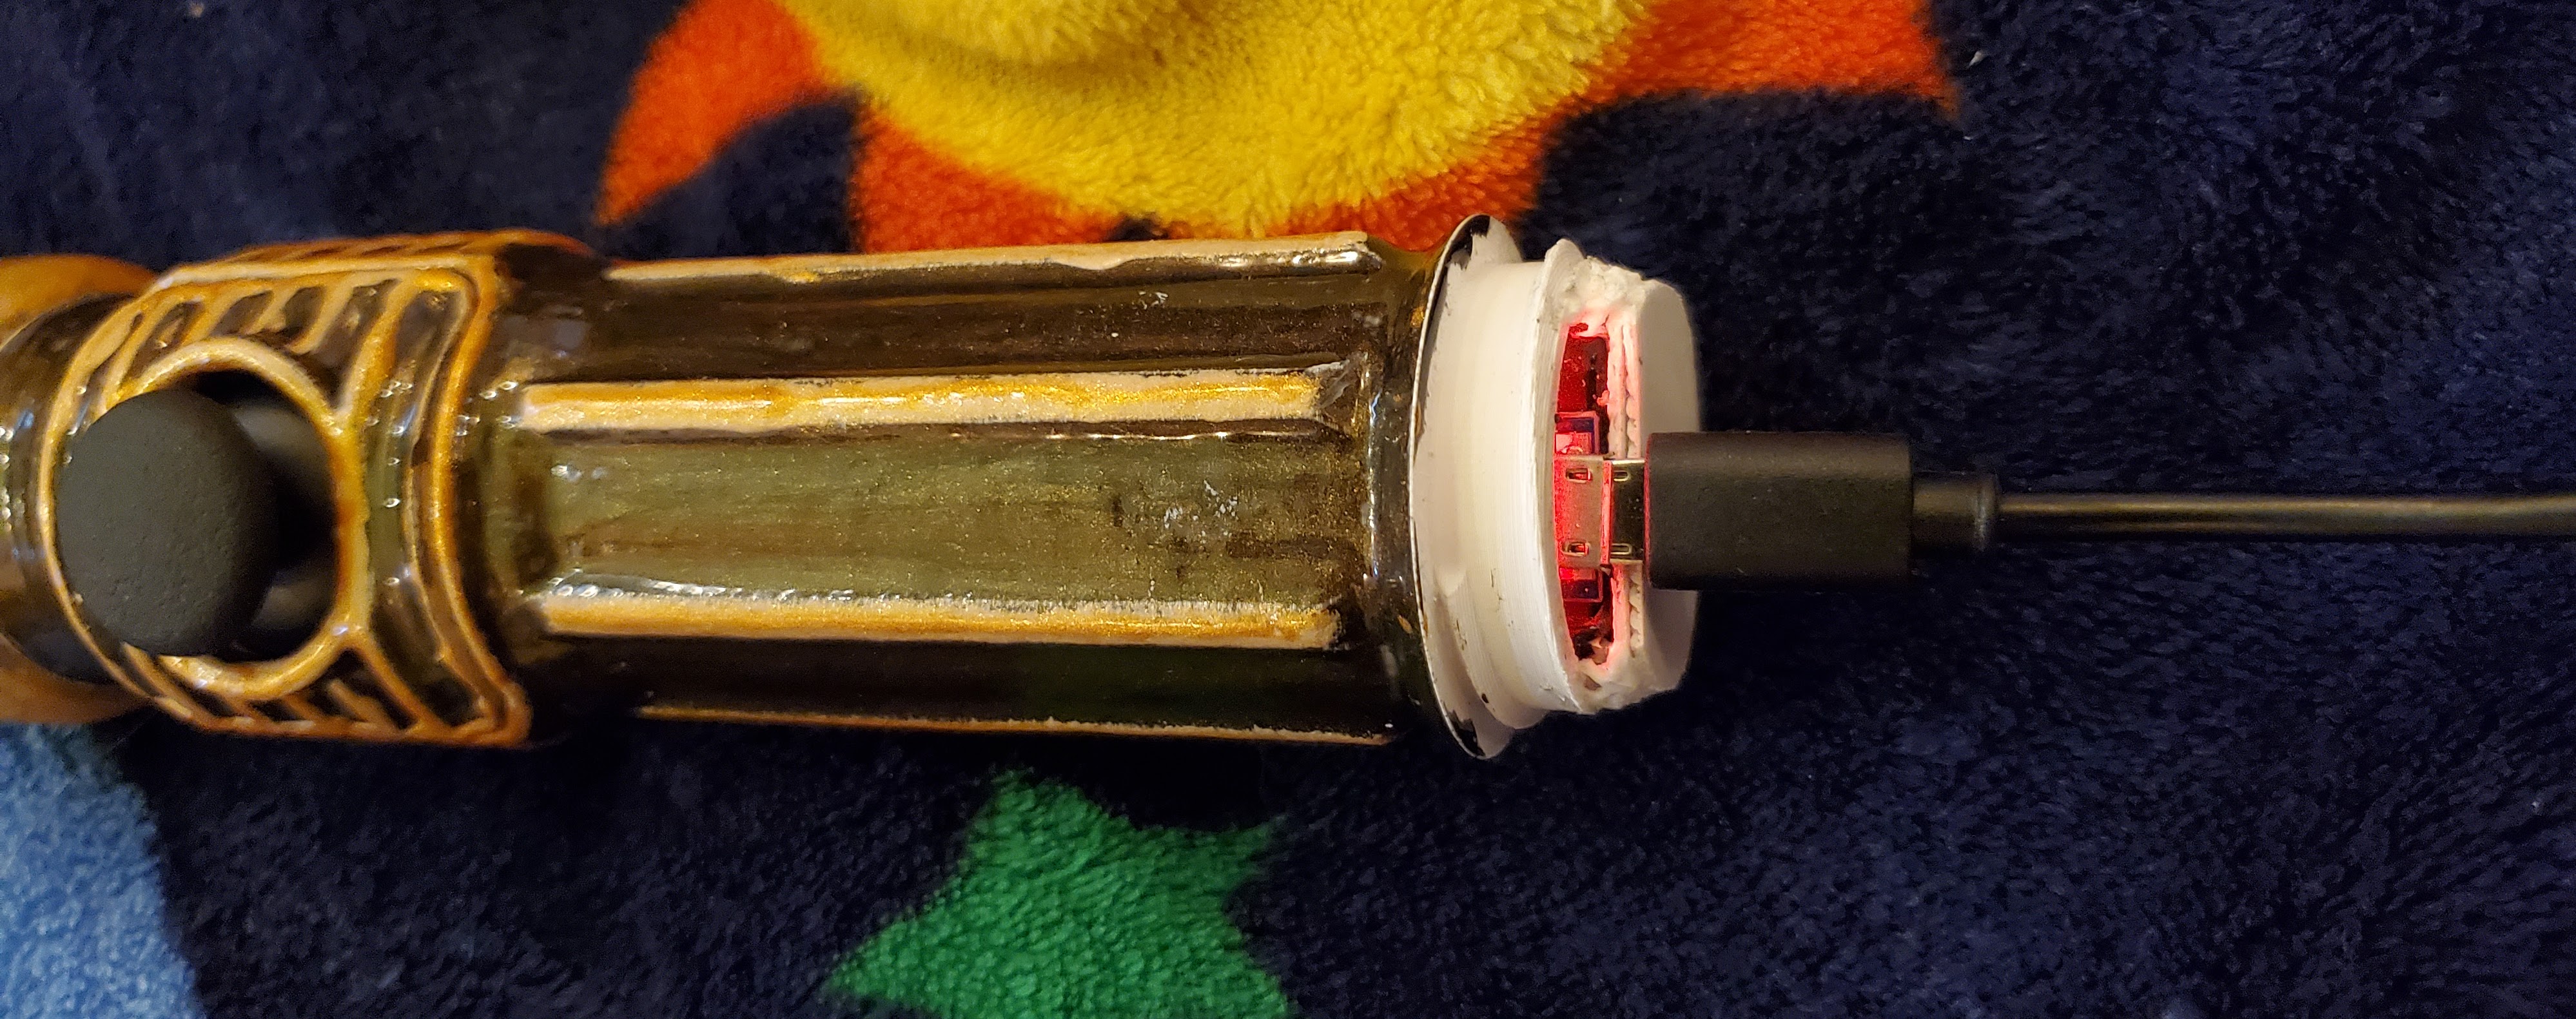 |
|---|
| Charging via USB Micro |
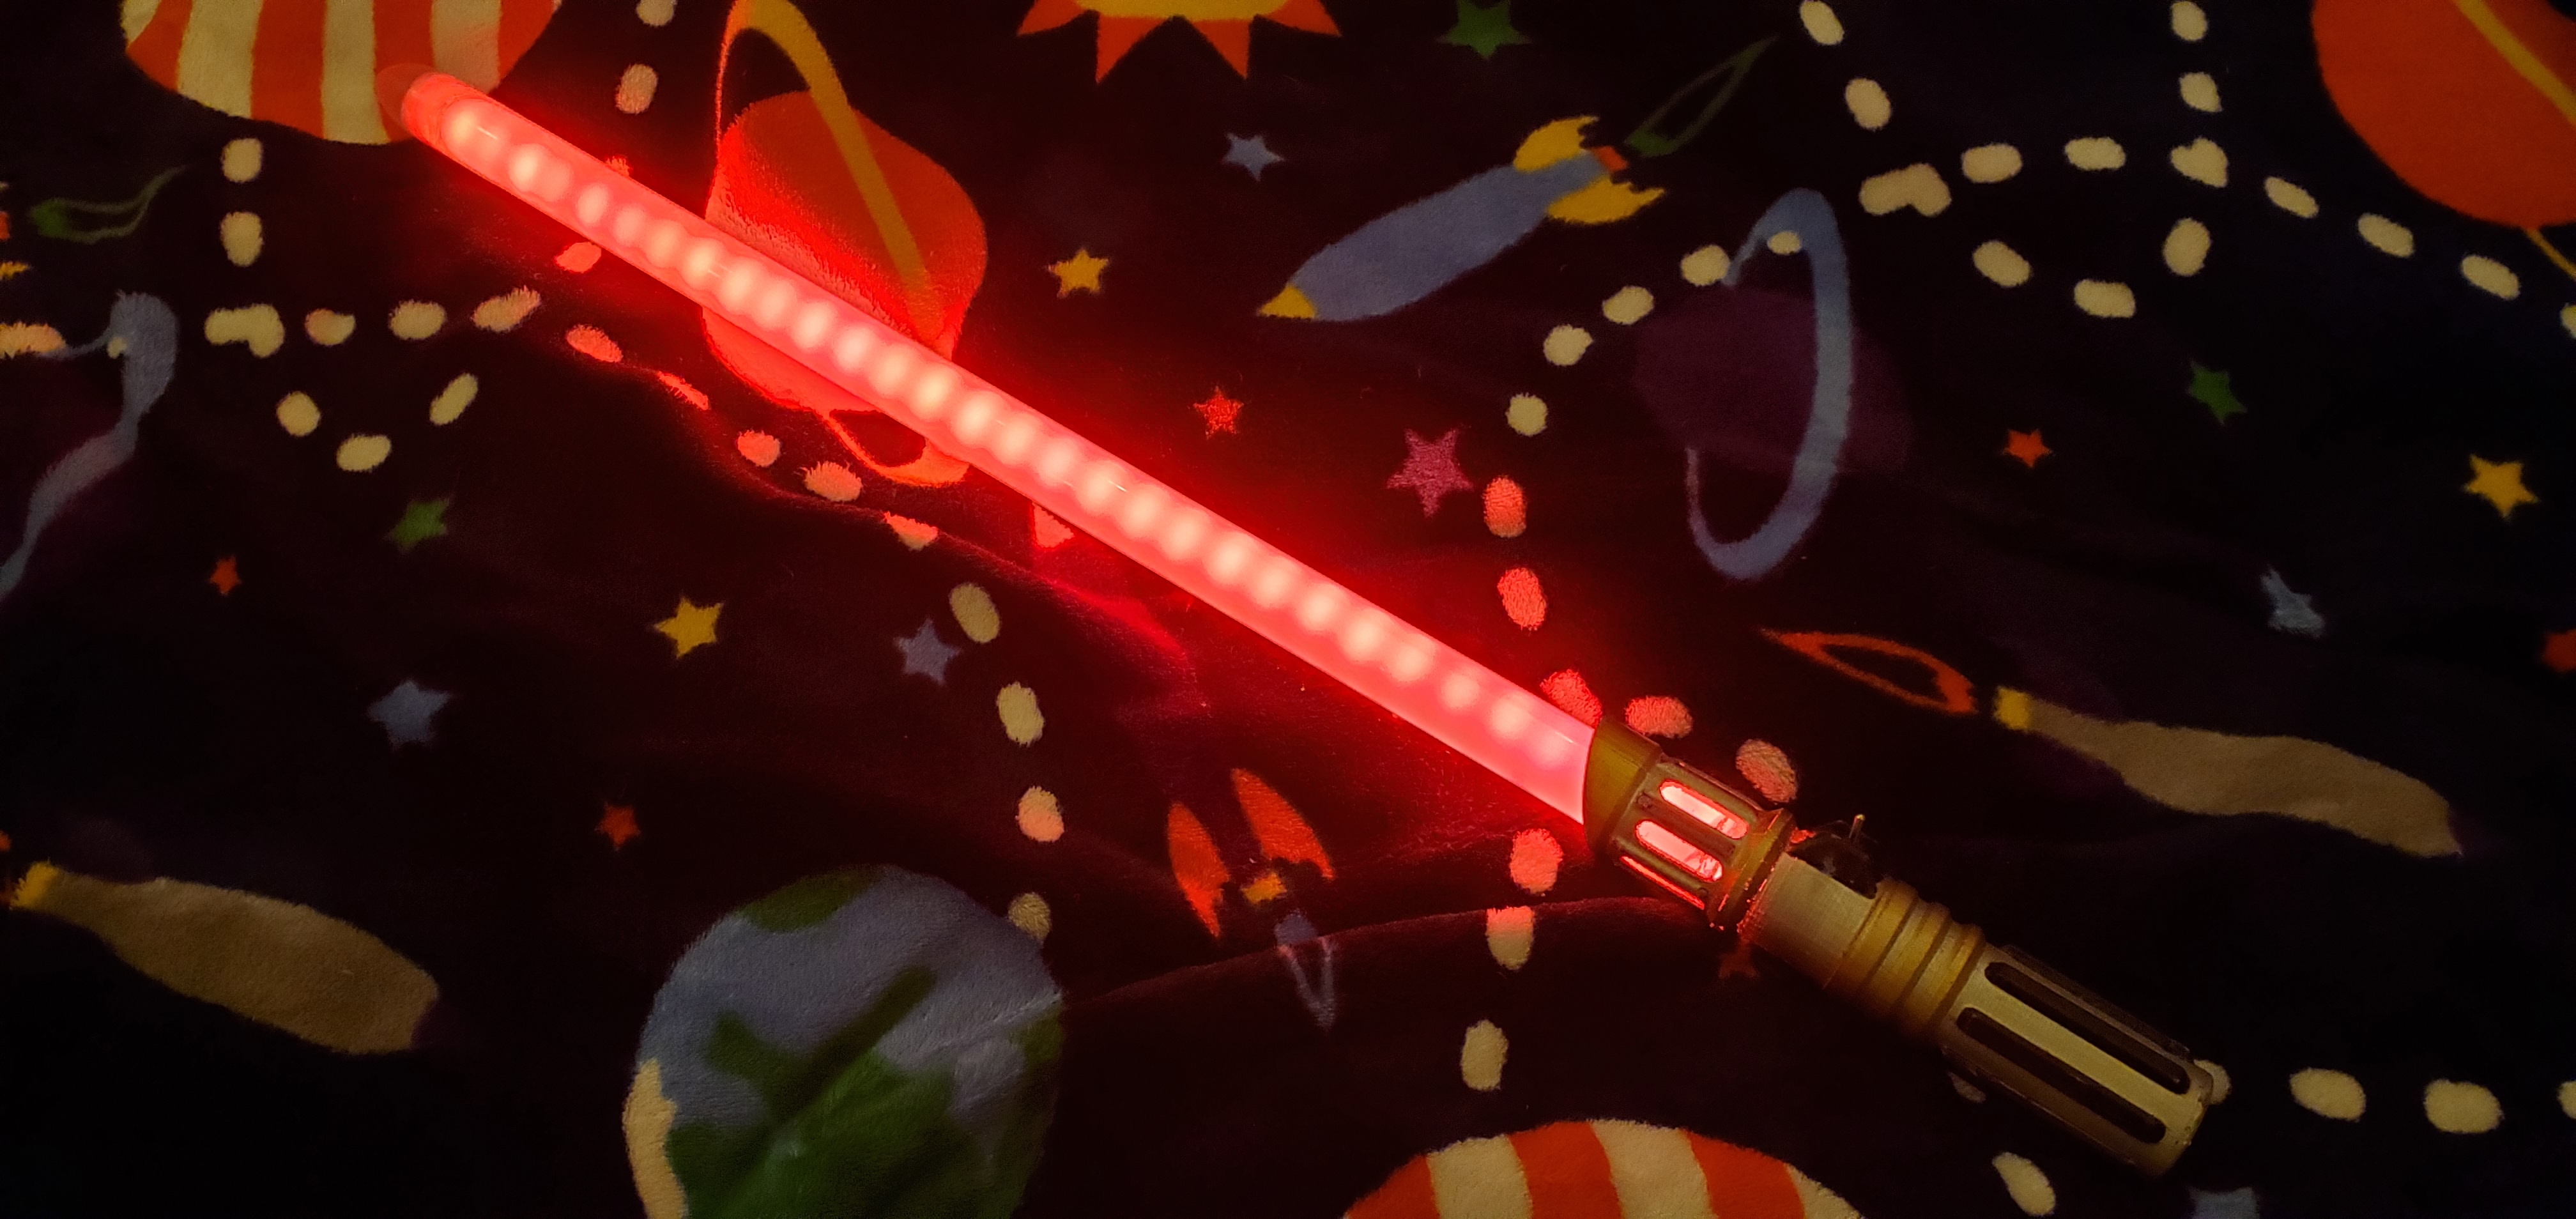
Even lighting
To avoid seeing the discrete LEDs within the acrylic tube, I first tried limiting the brightness. This worked okay, but I didn’t like that because I wanted this thing to be as bright as possible!
I swapped out the low density (60/m) WS2812s with high density ones (144/m) and taped them back-to-back. Then I got a nice piece of white foam tubing that I could just fit the LEDs within. This really helped even out the lighting and now I can’t see any sign of discrete LEDs, even at full brightness. Speaking of full brightness, I am right up against the 2A limit of the 3-5v boost converter I’m using. I don’t intentionally have any effects that show white light, but the controls on the rainbow effects can easily get wonky and essentially show all colors on top of eachother (white). It’s not ideal, and I think if I built this again I would limit the power in the code and possibly re-structure the rainbow function to avoid the ability to overlay colors to show white.
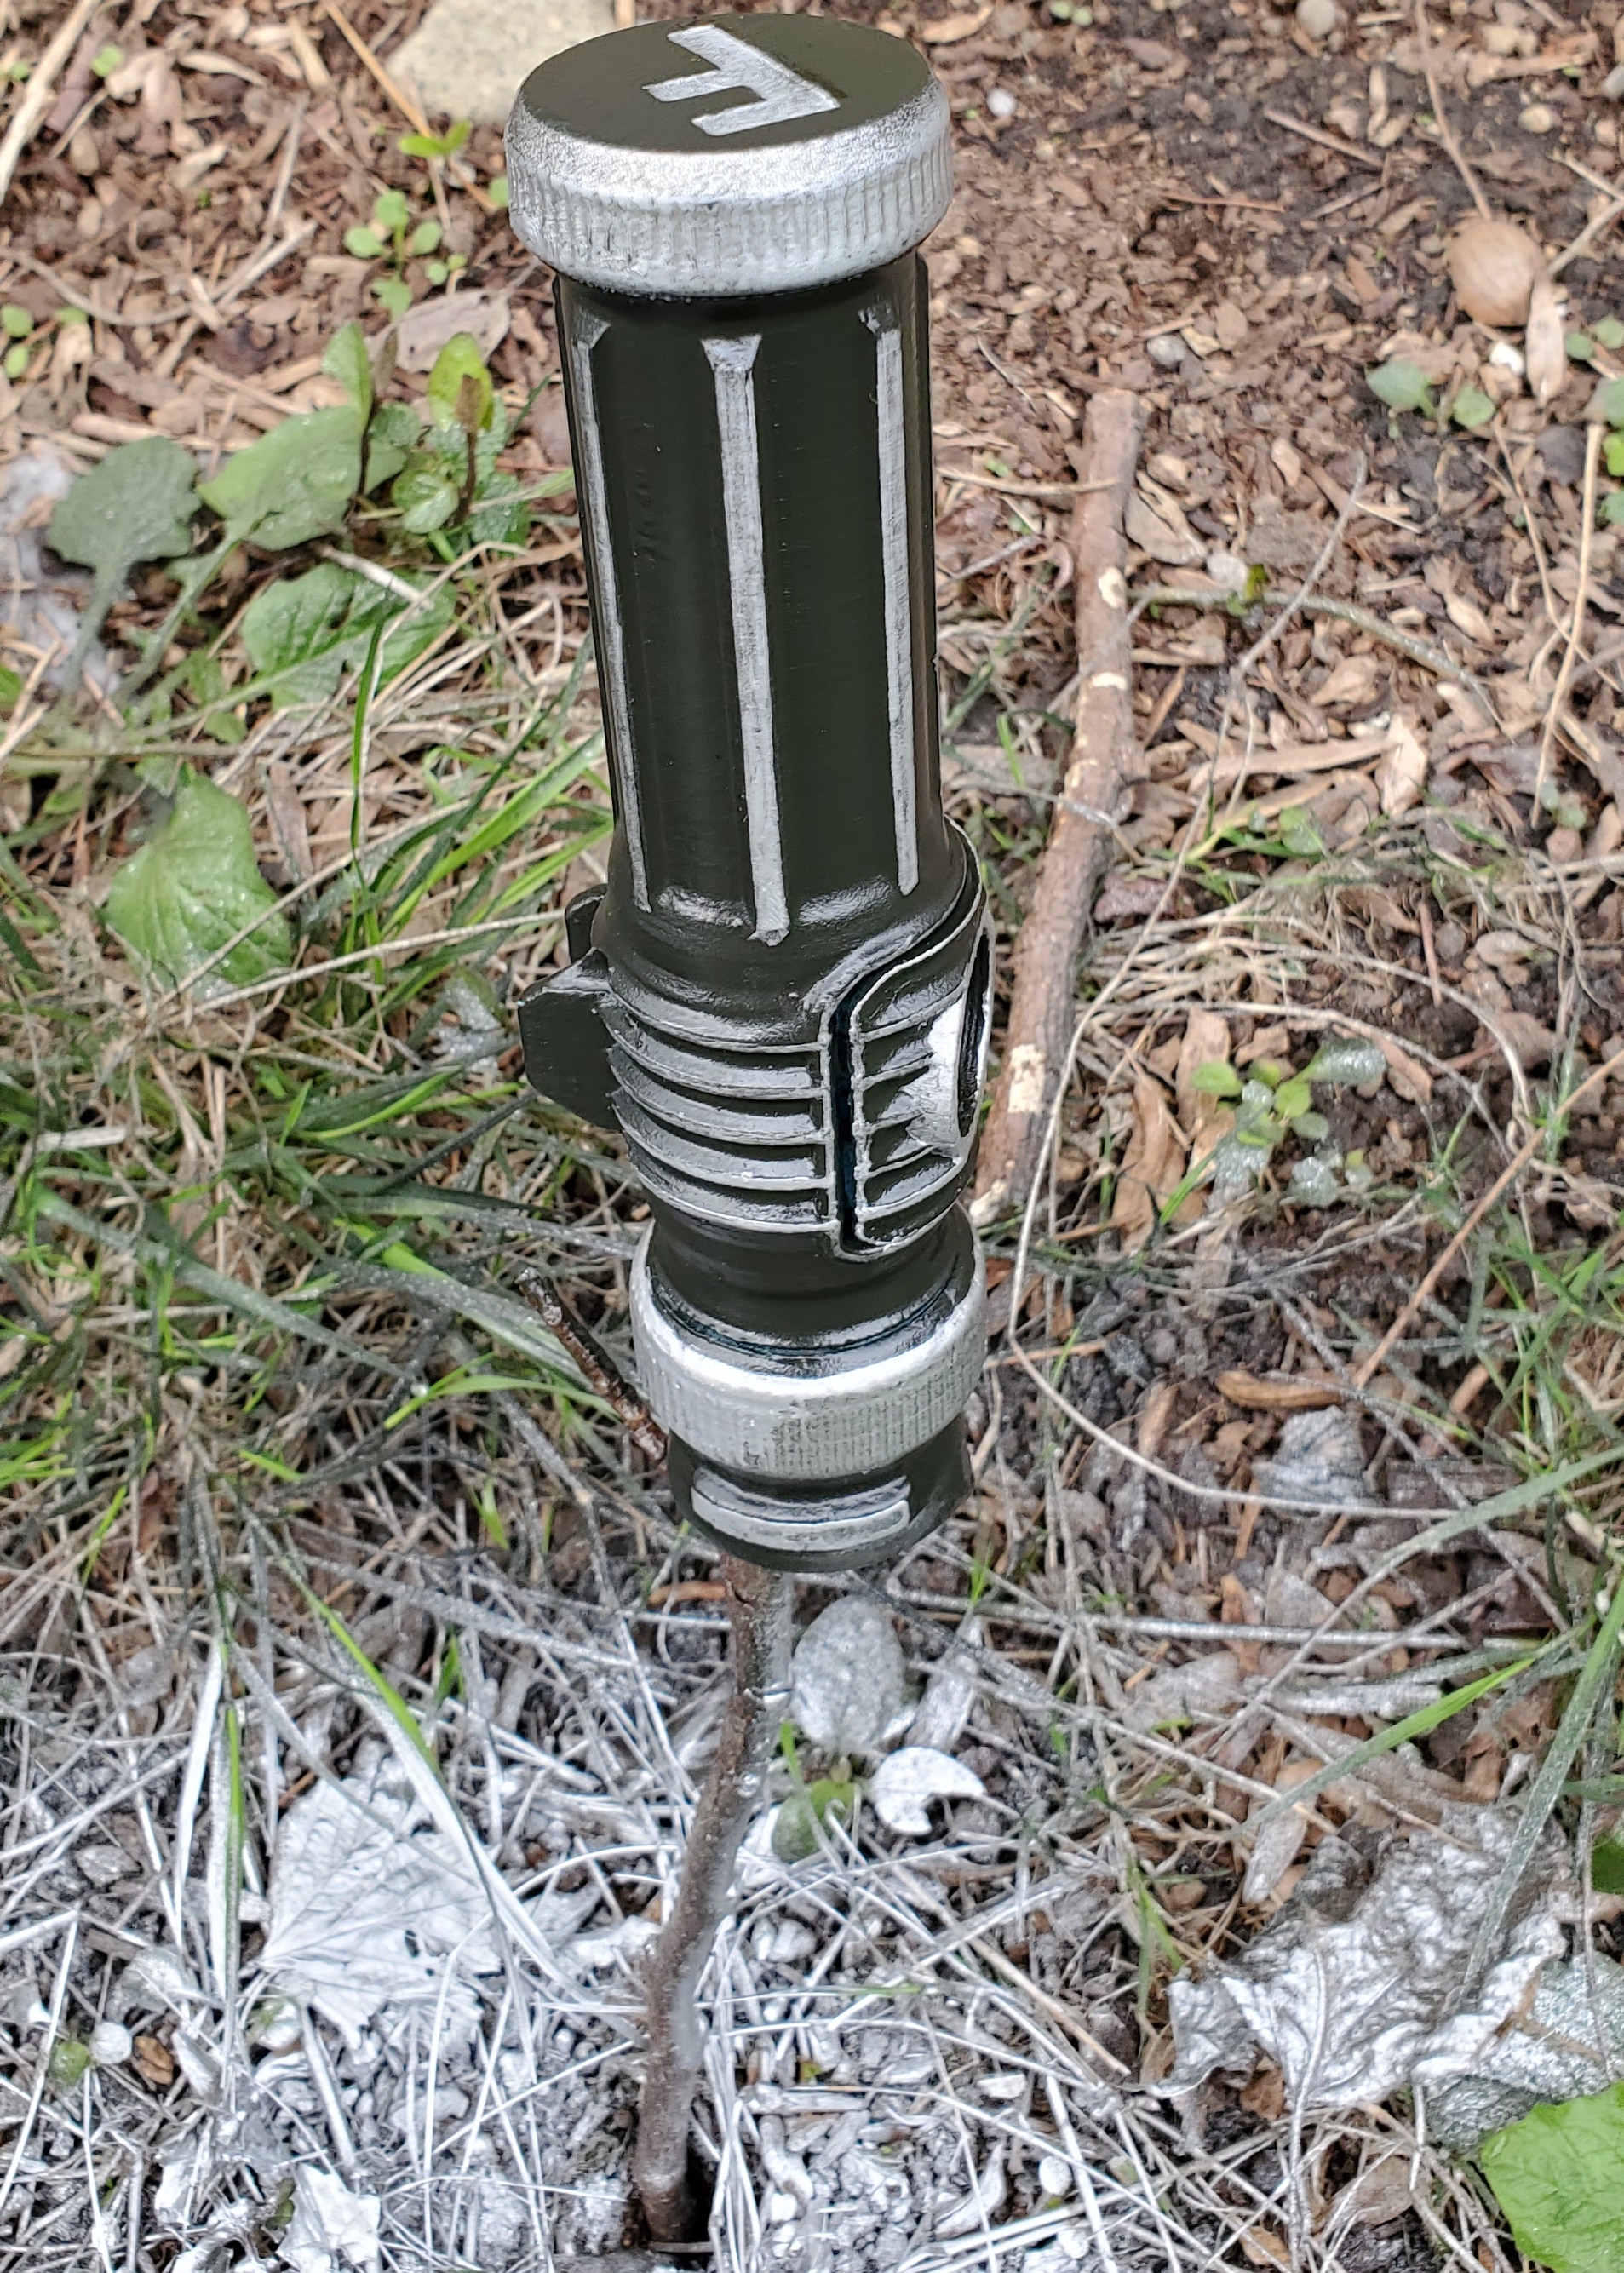
Finishing
I don’t have much experience making pretty finishes on 3D prints. Most of my ‘finished’ projects are just sanded, maybe with a coat of XTC 3D epoxy. For this one I wanted to go a bit further with the aesthetics. I tried using some spray paints like in my proto, but even after curing and a top coat their shiny finish was quickly dulled from handling. It seemed that the paint was always a bit gummy/ductile and easily dulled/scratched/chipped.
 |
 |
|---|---|
| Finish example using spray paint over ABS. Still a bit gummy, even after top coat. |
I ended up trying out some epoxy dyes and some shiny metal powder. Making small batches of epoxy with a single drop of dye and about 2g of metal powder, I was able to paint on thin epoxy coatings with very satisfying results. I did loose a bit of the fine detail of the 3D print from multiple layers of epoxy, but I will definitely be using this method going forward to make my finished prints more finished.
 |
|---|
| Finish example using XTC 3D Epoxy with dyes and metal powder |
Programming effects
The code running on the Arduino Pro Micro is based on the DemoReel sketch for the FastLED library. I’ve tweaked a few things to interact with the joystick and customized the patterns a bit. I also added a faux “on” effect where the lights extend gradually from the base to the tip when first turned on. Here are the included effects, which are changed by clicking the joystick:
- solid color (joystick controls hue, brightness)
- solid color with random sparkles (joystick controls hue, brightness)
- rainbow (joystick controls color width and rainbow speed/brightness)
- confetti (joystick controls hue, brightness)
Here’s a little demo of the effects:
Full code
#include "FastLED.h"
FASTLED_USING_NAMESPACE
#define DATA_PIN    5
#define BRIGHTNESS          0
#define FRAMES_PER_SECOND  120
#define LED_TYPE    WS2811
#define COLOR_ORDER GRB
#define NUM_LEDS    72
CRGB leds[NUM_LEDS];
int joyPin1 = 0; //hue pin definition
int joyPin2 = 1; //brightness pin definition
int value1 = 0; //read hue value init
int value2 = 0; //read brightness value init
int v = BRIGHTNESS;
const int buttonPin = 3; //joystick switch pin
int buttonPushCounter = 0;
int buttonState = 0;
int lastButtonState = 0;
bool startup = true; //performs lightsaber extension animation
int pulseSpeed = 10;
int pulseNumber = 7;
void setup() {
  Serial.begin(9600);
  pinMode(buttonPin, INPUT);
  delay(1000);
  FastLED.addLeds<LED_TYPE,DATA_PIN,COLOR_ORDER>(leds, NUM_LEDS).setCorrection(TypicalLEDStrip);
  FastLED.setBrightness(BRIGHTNESS);
}
// List of patterns to cycle through.  Each is defined as a separate function below.
typedef void (*SimplePatternList[])();
SimplePatternList gPatterns = { solid, solidGlitter, rainbowWave, confetti};
uint8_t gCurrentPatternNumber = 0; // Index number of which pattern is current
float gHue = 0; // rotating "base color" used by many of the patterns
void loop()
{
  if (startup) {
    v = 100;
    FastLED.setBrightness(100);
    for (int led = 0; led < (NUM_LEDS); led++) {
        leds[led] = CHSV(gHue, 255, v);
       FastLED.show();
       FastLED.delay(5); // create a wipe effect
      }
      startup = false;
  }
  //read joystick button switch
  buttonState = digitalRead(buttonPin);
  if (buttonState!=lastButtonState) {
    if (buttonState == HIGH) {
      buttonPushCounter++;
      //Serial.println("Button Press");
      //Serial.print("number of button pushes: ");
      //Serial.println(buttonPushCounter);
      }
     else {
        //Serial.println("off");
        nextPattern();
      }
  }
  lastButtonState = buttonState;
  //read joystick positions, modify gHue and v
    value1 = analogRead(joyPin1);
  if (value1>540) {
    gHue=gHue+.5;
    if (value1>900) {
      gHue=gHue+.5;
    }
  }
  else if (value1<475) {
    gHue=gHue-.5;
    if (value1<100) {
      gHue=gHue-.5;
    }
    if (gHue<=0) {
      gHue = 255;
    }
  }
  value2 = analogRead(joyPin2);
  if (value2>540 && v<254) {
    v++;
    if (value2>900) {
      v++;
    }
  }
  else if (value2<475 && v>0) {
    v--;
    if (value2<100) {
      v--;
    }
    if (v<0) {
      v = 0;
    }
  }
  //Report values to Serial Monitor
  //EVERY_N_MILLISECONDS(500) {
  //String s = "L/R:" + String(value1) + ", " + String(gHue) + "... Up/Down:" + String(value2) + ", " + String(v);
  //Serial.println(s);
  //}
  FastLED.setBrightness (v);
  // Call the current pattern function once, updating the 'leds' array
  gPatterns[gCurrentPatternNumber]();
  // send the 'leds' array out to the actual LED strip
  FastLED.show();
  // insert a delay to keep the framerate modest
  FastLED.delay(1000/FRAMES_PER_SECOND);
}
#define ARRAY_SIZE(A) (sizeof(A) / sizeof((A)[0]))
void nextPattern()
{
  // add one to the current pattern number, and wrap around at the end
  gCurrentPatternNumber = (gCurrentPatternNumber + 1) % ARRAY_SIZE( gPatterns);
  //String g = "New pattern = " + String(gCurrentPatternNumber);
  //Serial.println(g);
}
void solid()
{
  // fill solid and allow gHue to update color
  fill_solid( leds, NUM_LEDS, CHSV(gHue, 255, v));
}
void solidGlitter()
{
  solid();
  addGlitter(80);
}
void rainbowWave()
{
  // FastLED's built-in rainbow generator
  uint8_t thisHue = -beat8(pulseSpeed,255);
  if (value1>550) {
    pulseSpeed++;
    if (pulseSpeed>200) {
      pulseSpeed = 200;
    }
  }
  else if (value1<450) {
    pulseSpeed--;
    if (pulseSpeed<0) {
      pulseSpeed = 0;
    }
  }
  if (value2>550) {
    pulseNumber++;
    if (pulseNumber>100) {
      pulseNumber = 200;
      v--;
      if (value2>900) {
        v--;
      }
    }
  }
  else if (value2<450) {
    pulseNumber--;
    if (pulseNumber<0) {
      pulseNumber = 0;
      v++;
      if (value2<100) {
        v++;
      }
    }
  }
  FastLED.setBrightness (v);
  fill_rainbow( leds, NUM_LEDS, thisHue, pulseNumber);
}
void addGlitter( fract8 chanceOfGlitter)
{
  if( random8() < chanceOfGlitter) {
    leds[ random16(NUM_LEDS) ] += CRGB::White;
  }
}
void confetti()
{
  // random colored speckles that blink in and fade smoothly
  fadeToBlackBy( leds, NUM_LEDS, 10);
  int pos = random16(NUM_LEDS);
  leds[pos] += CHSV( gHue + random8(64), 200, 255);
}
Future improvements
Overall I’m quite satisfied with how this turned out. However if I ever wanted to re-design this (I don’t!), I would target a couple aspects:
- Further minimize stress concentrations - possibly re-designing how the joystick mounts. It would be great to be comfortable using this to hit stuff.
- Limit max power in code & adjust controls on rainbow function to avoid weirdness.
- Consider pogo pins for the electrical connections between the different sections to minimize wires (and possibly allow smaller pieces with threaded connections).
- Accelerometer and small speaker could be nice to map some swooshing sounds when swinging.